RTMPose Real-Time Demonstration
This tutorial guides you through real-time acquisition and demonstration of the RTMPose model on RevyOS. RTMPose is a high-performance human pose estimation model based on the MMPose framework.
Before proceeding, please ensure you have completed the environment setup section.
Real-Time Image Acquisition
For RevyOS on LPi4A, it is recommended to use a USB camera for plug-and-play functionality. The camera input is used as the model input, and each captured frame is preprocessed and fed to the model for inference. In previous tutorials, you have already run the model using images. Next, you will use the OpenCV interface to acquire input from the camera and demonstrate the model in real time.
Simply copy main_2.py from Tutorial 2 to main_3.py, and replace the main function with the following code:
def main():
    args = parse_args()
    logger.info('Start running model on RTMPose...')

    # build onnx model
    logger.info('1. Build onnx model ...')
    sess = build_session(args.onnx_file, args.device)
    sess1 = build_session("rtmpose1_fp16.onnx", args.device)
    hhb_sess = shl_wrapper.load_model("shl.hhb.bm")
    h, w = sess.get_inputs()[0].shape[2:]
    model_input_size = (w, h)

    cap = cv2.VideoCapture(0)

    while True:
        ret, frame = cap.read()

        if not ret:
            logger.info("cannot get frame")
            break

        # read image from camera
        logger.info('2. Read image from camera')
        cv2.imshow("USB Camera", frame)

        # preprocessing
        logger.info('3. Preprocess image...')
        resized_img, center, scale = preprocess(frame, model_input_size)

        # inference
        logger.info('4. Inference...')
        start_time = time.time()
        resized_img = resized_img.transpose(2, 0, 1)
        resized_img = resized_img.astype(np.float32)
        hhb_input = np.copy(resized_img, order="C")
        shl_wrapper.session_run(hhb_sess, [hhb_input])
        output0 = shl_wrapper.get_output_by_index(hhb_sess, 0)

        outputs = inference(sess1, output0.reshape(133,8,6))
        end_time = time.time()
        logger.info('4. Inference done, time cost: {:.4f}s'.format(end_time -
                                                                   start_time))
        # postprocessing
        logger.info('5. Postprocess...')
        keypoints, scores = postprocess(outputs, model_input_size, center, scale)

        # visualize inference result
        logger.info('6. Visualize inference result...')
        vframe = visualize(frame, keypoints, scores, args.save_path)

        cv2.imshow("USB Camera", vframe)

        cv2.waitKey(100)

        if cv2.waitKey(1) == 27:
            break

    logger.info('Done...')
    cap.release()
    cv2.destroyAllWindows()
Run the program with the following command. Upon successful execution, the output will be similar to that of Tutorials 1 and 2:
$ python3 camera.py rtmpose0.onnx
Before running the program, please ensure the camera is connected to the development board and the camera driver is correctly installed. You can check if the camera device exists using the following command:
$ ls /dev/video*
You can also use the following opencv-python code to test whether the camera can capture images:
import cv2

# Open the camera
cap = cv2.VideoCapture(0)

# Check if the camera opened successfully
if not cap.isOpened():
    print("Unable to open camera")
    exit()

# Continuously read frames from the camera
while True:
    # Capture a frame from the camera
    ret, frame = cap.read()

    # Check if the frame was captured successfully
    if not ret:
        print("Unable to get image")
        break

    # Display the image
    cv2.imshow("USB Camera", frame)

    # Wait for ESC key to exit
    if cv2.waitKey(1) == 27:
        break

# Release the camera and close all windows
cap.release()
cv2.destroyAllWindows()
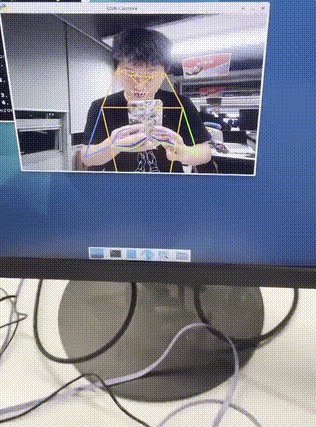
After main_3.py runs successfully, if a person appears in front of the camera, the model will perform inference and dynamic pose analysis on the captured image.