RTMPose Performance Optimization
This tutorial guides you through optimizing the inference latency of the RTMPose model on RevyOS.
The tutorial includes:
- Splitting a single model into two sub-models
- Quantizing the first sub-model to int16 and running it on the NPU
- Quantizing the second sub-model to float16 and running it on the CPU
Environment Preparation
Installing Dependencies
This tutorial requires some additional packages. Please install the dependencies after creating your virtual environment:
$ sudo apt update && sudo apt install cmake
$ pip install onnx onnxconverter_common
Splitting the ONNX Model
Extracting the First Part
Use the following script (rtmpose0.py) to extract the first part of the original model. The resulting model is named rtmpose0.onnx.
import onnx

input_path = "rtmpose.onnx"
output_path = "rtmpose0.onnx"
input_names = ["input"]
output_names = ["/final_layer/Conv_output_0"]

onnx.utils.extract_model(input_path, output_path, input_names, output_names)
Run the script locally to generate the rtmpose0.onnx model.
Extracting the Second Part
Use the following script (rtmpose1.py) to extract the second part of the original model. The resulting model is named rtmpose1.onnx.
import onnx

input_path = "rtmpose.onnx"
output_path = "rtmpose1.onnx"
input_names = ["/final_layer/Conv_output_0"]
output_names = ["simcc_x", "simcc_y"]

onnx.utils.extract_model(input_path, output_path, input_names, output_names)
Run the script locally to generate the rtmpose1.onnx model.
NPU Quantization and Execution
NPU quantization requires collecting calibration data before quantizing and generating a model file executable on LPi4A NPU.
Collecting Quantization Data
Copy main.py to npz.py and replace the main function with the following code:
NPU Quantization and Execution
NPU quantization requires collecting calibration data before quantizing and generating a model file executable on LPi4A NPU.
Collecting Quantization Data
Copy main.py to npz.py and replace the main function with the following code:
def main():
    args = parse_args()
    logger.info('Start running model on RTMPose...')

    # read image from file
    logger.info('1. Read image from {}...'.format(args.image_file))
    img = cv2.imread(args.image_file)

    # build onnx model
    logger.info('2. Build onnx model from {}...'.format(args.onnx_file))
    sess = build_session(args.onnx_file, args.device)

    h, w = sess.get_inputs()[0].shape[2:]
    model_input_size = (w, h)

    # preprocessing
    logger.info('3. Preprocess image...')
    resized_img, center, scale = preprocess(img, model_input_size)

    # inference
    logger.info('4. Inference...')
    start_time = time.time()
    resized_img = resized_img.transpose(2, 0, 1)

    resized_img_npz = resized_img.reshape(1, 3, 256, 192).astype(np.float32)
    np.savez("test.npz", input=resized_img_npz)
After replacing the function, run npz.py to obtain the calibration data required for quantization. The preprocessed result of the input image will be saved as test.npz in the current directory:
$ python3 npz.py rtmpose0.onnx human-pose.jpeg
Model Quantization
On the x86 terminal, use the test.npz file generated above as calibration data. The following HHB command converts the ONNX model into a model file required for LPi4A execution:
$ hhb -f rtmpose0.onnx -cd test.npz -is "1 3 256 192" -in "input" \
    -on "/final_layer/Conv_output_0" --board th1520 -D --quantization-scheme int16_sym
Generating Model Files
Copy the hhb_out directory to the development board and execute hhb_runtime. Upon successful execution, the shl.hhb.bm model weight file required for NPU execution will be generated:
$ ./hhb_runtime hhb.bm input.0.bin
CPU Quantization and Execution
Model Quantization
Quantize the second part of the model to float16 using the following script (rtmpose1_fp16.py):
import onnx
from onnxconverter_common import float16

model = onnx.load("rtmpose1.onnx")
model_fp16 = float16.convert_float_to_float16(model)
onnx.save(model_fp16, "rtmpose1_fp16.onnx")
Run the script locally to generate the rtmpose1_fp16.onnx model.
Model Chaining
After quantized execution on both NPU and CPU, chain the two models for sequential execution. Copy main.py to main_2.py and replace the main function with the following code:
def main():
    args = parse_args()
    logger.info('Start running model on RTMPose...')

    # read image from file
    logger.info('1. Read image from {}...'.format(args.image_file))
    img = cv2.imread(args.image_file)

    # build onnx model
    logger.info('2. Build onnx model from {}...'.format(args.onnx_file))
    sess = build_session(args.onnx_file, args.device)
    sess1 = build_session("rtmpose1_fp16.onnx", args.device)
    hhb_sess = shl_wrapper.load_model("shl.hhb.bm")
    h, w = sess.get_inputs()[0].shape[2:]
    model_input_size = (w, h)

    # preprocessing
    logger.info('3. Preprocess image...')
    resized_img, center, scale = preprocess(img, model_input_size)

    # inference
    logger.info('4. Inference...')
    start_time = time.time()
    resized_img = resized_img.transpose(2, 0, 1)

    # resized_img_npz = resized_img.reshape(1, 3, 256, 192).astype(np.float32)
    # np.savez("test.npz", input=resized_img_npz)

    resized_img = resized_img.astype(np.float32)
    hhb_input = np.copy(resized_img, order="C")

    shl_wrapper.session_run(hhb_sess, [hhb_input])
    output0 = shl_wrapper.get_output_by_index(hhb_sess, 0)

    outputs = inference(sess1, output0.reshape(133,8,6))

    end_time = time.time()
    logger.info('4. Inference done, time cost: {:.4f}s'.format(end_time -
                                                               start_time))

    # postprocessing
    logger.info('5. Postprocess...')
    keypoints, scores = postprocess(outputs, model_input_size, center, scale)

    # visualize inference result
    logger.info('6. Visualize inference result...')
    visualize(img, keypoints, scores, args.save_path)

    logger.info('Done...')
Run the following command to execute the program:
python3 main_3.py rtmpose.onnx human-pose.jpeg
After successful execution, the output will be similar to that of Part 1 of this tutorial.
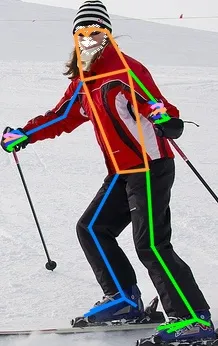
The output image output.jpg will be generated locally, with the same effect as in Tutorial 1. After the above performance optimization steps, the expected processing time per frame can be reduced to within 100 ms.
Upon successful execution, you will see the output image output.jpg.