RTMPose Basic Execution
This tutorial guides you through the basic execution of the RTMPose model on the RevyOS system. RTMPose is a high-performance human pose estimation model.
Before proceeding, please ensure you have completed the environment setup section.
Environment Preparation
Creating a Virtual Environment
It is recommended to use a virtual environment to isolate dependencies. You can use either venv or conda to create a virtual environment.
$ mkdir rtmpose && cd rtmpose
$ python3 -m venv rtmpose
$ source rtmpose/bin/activate
Installing Dependencies
Download the SHL backend (execution providers), allowing onnxruntime to utilize SHL's high-performance optimization for C-SKY CPUs.
$ git clone -b python3.11 https://github.com/zhangwm-pt/prebuilt_whl.git
$ cd prebuilt_whl
$ pip3 install opencv_python-4.5.4+4cd224d-cp311-cp311-linux_riscv64.whl loguru onnx
Obtaining Example Code
The example code for this tutorial is available on Github. Clone it locally using the following commands:
$ git clone https://github.com/open-mmlab/mmpose.git
$ cd mmpose/projects/rtmpose/examples/onnxruntime
Obtaining the Model
The model used in this tutorial is available from the Github repository. Download the RTMPose model using the following command:
$ wget https://github.com/zhangwm-pt/mmpose/releases/download/rtmpose-onnx/rtmpose.onnx
If you encounter network issues accessing GitHub from mainland China, consider using a network proxy tool to accelerate access.
Running the Program
Navigate to the ONNX example directory in the source code and run main.py for model inference:
$ python3 main.py rtmpose.onnx human-pose.jpeg
- rtmpose.onnx: The pre-downloaded model file
- human-pose.jpeg: The sample image provided in the example
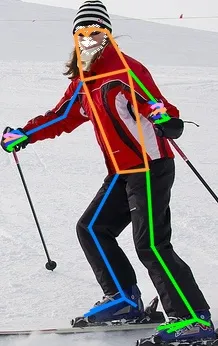
Upon successful execution, you will see the output image output.jpg.