Lichee Pi 4A Image Flashing Guide (Linux)
This page provides the Linux workflow for flashing the Lichee Pi 4A images. If you need the Windows procedure or flashing guides for other devices, use the links in the table below.
| Other Flashing Tutorials | Link |
|---|---|
| Lichee Pi 4A (Windows) | Windows flashing guide |
| Milk-V Pioneer | Flashing guide |
| Milk-V Meles | Flashing guide |
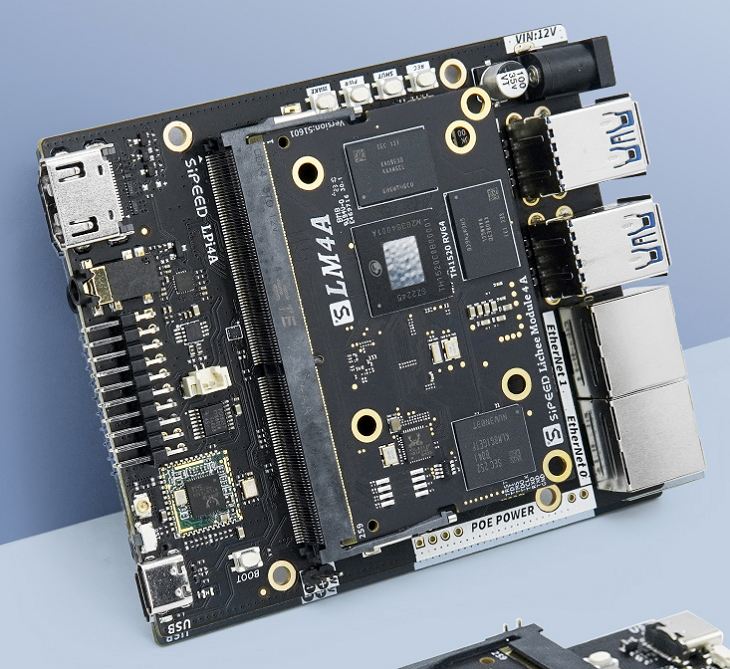
Before you begin, compare your board with the image below and confirm they match. Proceed only after verifying the hardware.
Demonstration Environment
All operations in this tutorial were performed under the following environment:
- Operating system: Ubuntu 22.04.5 LTS
- Architecture: x86_64
- Lichee Pi 4A configuration: 16 GB RAM + 128 GB eMMC
Every step described here is reproducible in the environment above. If you encounter issues during flashing, please refer to issue submission.
Tooling
This section covers the software required for downloading and flashing images. Install the tools first before proceeding with the flashing workflow.
File Download Utility
In a graphical environment you can download images directly through a browser. To download from the command line, tools such as wget or curl are available; this guide uses wget.
In the demonstration environment, wget is typically pre-installed. Run the following command to check its version:
wget --version
If wget is not installed, install it with:
sudo apt install wget

Executing commands with
sudoprompts for your password. Ensure you know the password before running the command; this will not be repeated later in the document.
Archive Extraction Utility
The .zst archives can be extracted using tools such as zstd, tar, or 7z. This tutorial demonstrates extraction with the zstd command-line tool. Install the zstd package first, then extract the image.
To check whether zstd is already installed, run:
zstd --version

If a version string similar to the following is printed, zstd is installed:
*** zstd command line interface 64-bits v1.4.8, by Yann Collet ***
If no version information appears, install zstd with:
sudo apt update
sudo apt install zstd
![]()
Boot Methods
Lichee Pi 4A currently supports two boot options: booting from an SD card and booting from eMMC. Choose the section corresponding to your use case.
Flashing an image erases all existing data regardless of the method. Back up important data beforehand.
Upgrading from images dated 20240720 or earlier requires resetting the U-Boot environment variables.
Reset procedure: Connect to the board over the serial console, power it on, interrupt U-Boot by pressing Enter, and run the following commands:
env default -a -f; env save; reset
This restores all U-Boot environment variables to their defaults and reboots the board.
Boot from SD Card
DIP switch reminder
No switch changes are required for SD card boot; keep the DIP switches in the eMMC position.
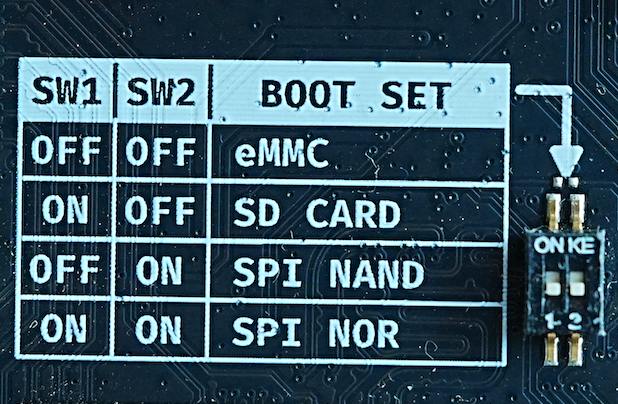
The DIP switch is located on the underside of the board and is accessible after removing the baseboard. Set both toggles to the downward position.
Note: Some early Lichee Pi 4A revisions do not provide a DIP switch.
SD card compatibility
Certain SD cards may exhibit compatibility issues. Consult the Lichee Pi 4A SD card compatibility list to confirm whether your card is known to work.
Preparation
Obtain the SD Card Image
Download the Lichee Pi 4A system image that has the sdcard- prefix from the following locations:
- RevyOS 20240720 (Kernel 5.10)
- Latest release (Kernel 6.6): 20251226
About kernel versions
The 20240720 image uses Kernel 5.10, which is mature and offers stable performance for multimedia and general applications.
The latest image uses Kernel 6.6. It may still contain unresolved issues; known ones include video stutter and USB power loss. Fixes are in progress.
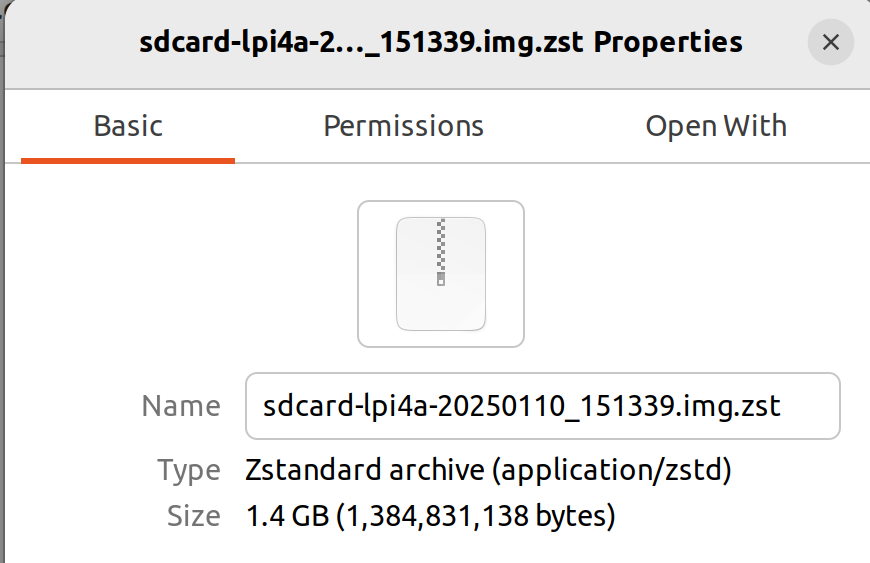
The example below uses the 20250110 image.
The downloaded
.zstarchive is approximately 1.4 GB. Ensure you have at least 12 GB of free space to avoid running out of storage during download or extraction.
Two download methods are available:
- Browser download: click the link; the browser starts downloading automatically. Confirm that the file is saved locally.
- Command-line download: use
wgetas shown below.
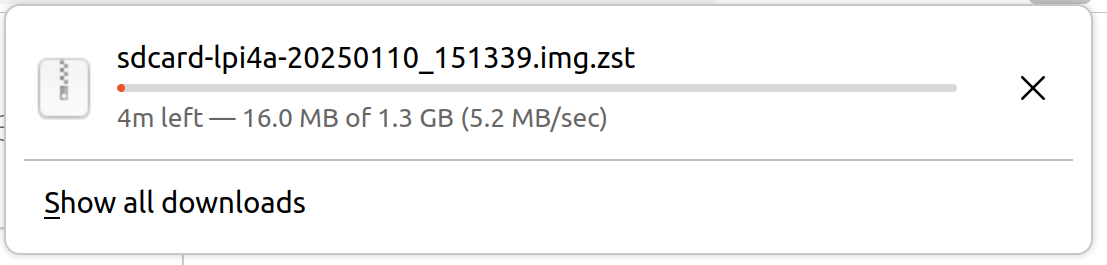
wget https://mirror.iscas.ac.cn/revyos/extra/images/lpi4a/20250110/sdcard-lpi4a-20250110_151339.img.zst

After downloading, you obtain sdcard-lpi4a-20250110_151339.img.zst. This is a compressed archive rather than the final image. Extract sdcard-lpi4a-20250110_151339.img.zst to obtain sdcard-lpi4a-20250110_151339.img.
With zstd installed, extract the archive:
Extraction size reminder
The extracted image is roughly 10.2 GB. Verify that you have sufficient disk space before running the extraction.
sudo unzstd sdcard-lpi4a-20250110_151339.img.zst
After extraction you will have sdcard-lpi4a-20250110_151339.img and the image acquisition step is complete.

Hardware Preparation
Prepare a MicroSD card reader and a MicroSD card. Compatibility issues with SD cards are known; refer to the tested card list.
Writing the SD Card Image
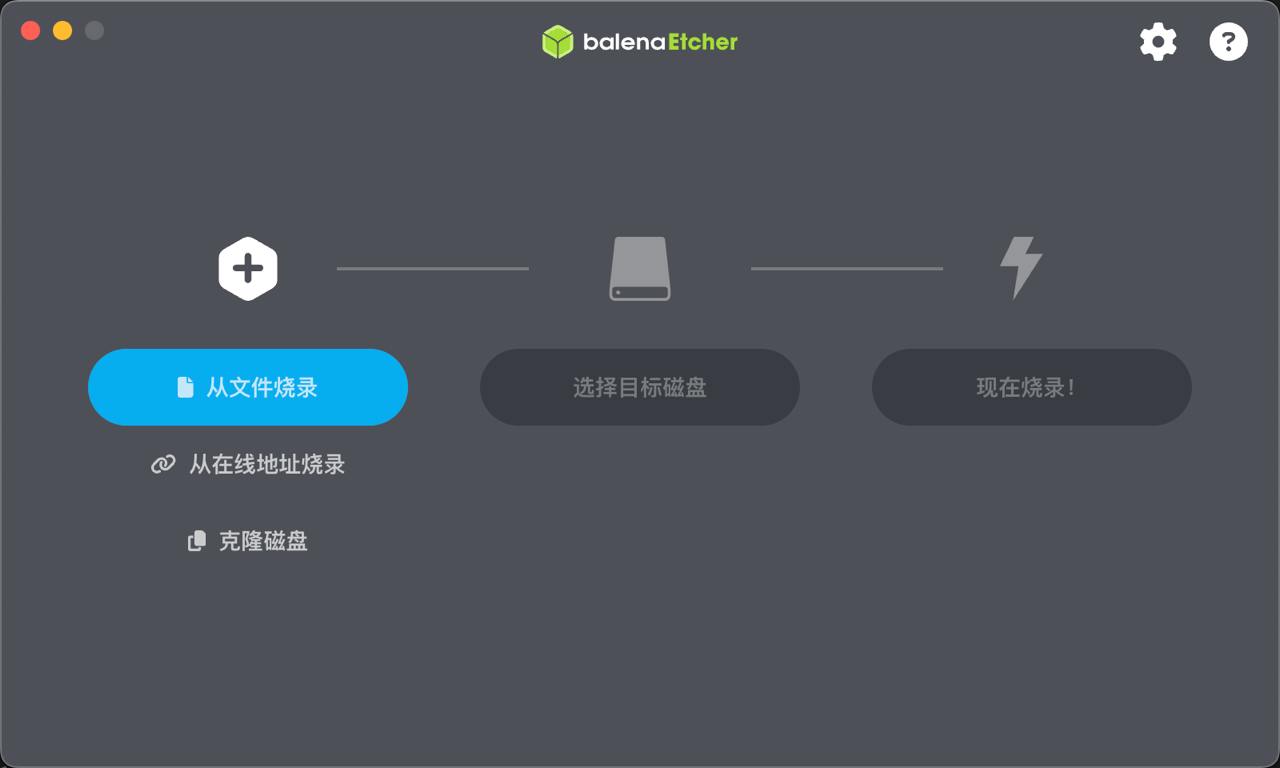
Two methods are available for writing an SD card image: using a graphical tool such as BalenaEtcher, or the command-line dd utility.
Writing with BalenaEtcher
Download BalenaEtcher from the official site: https://etcher.balena.io/. Choose the build that matches your host. In the demonstration environment, download and extract Etcher for Linux x64 (64-bit) (zip).

Insert the SD card into the reader and connect it to the computer.
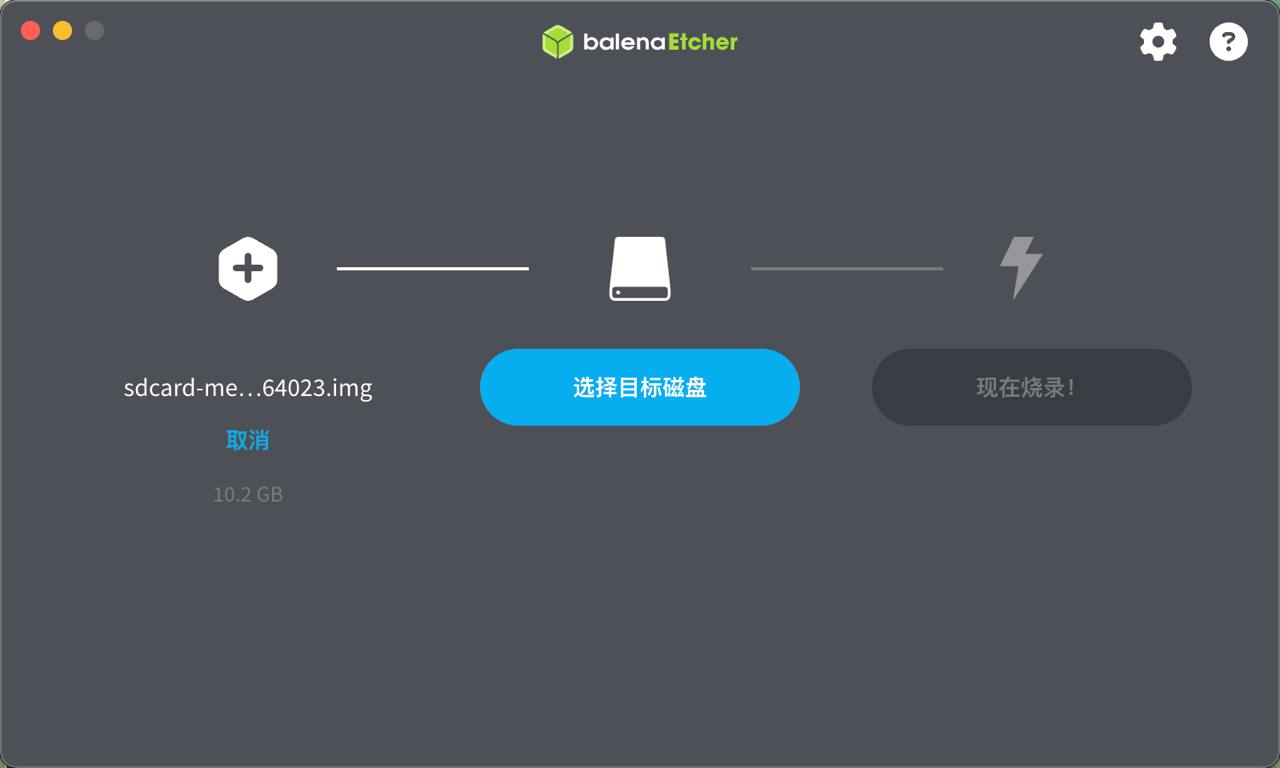
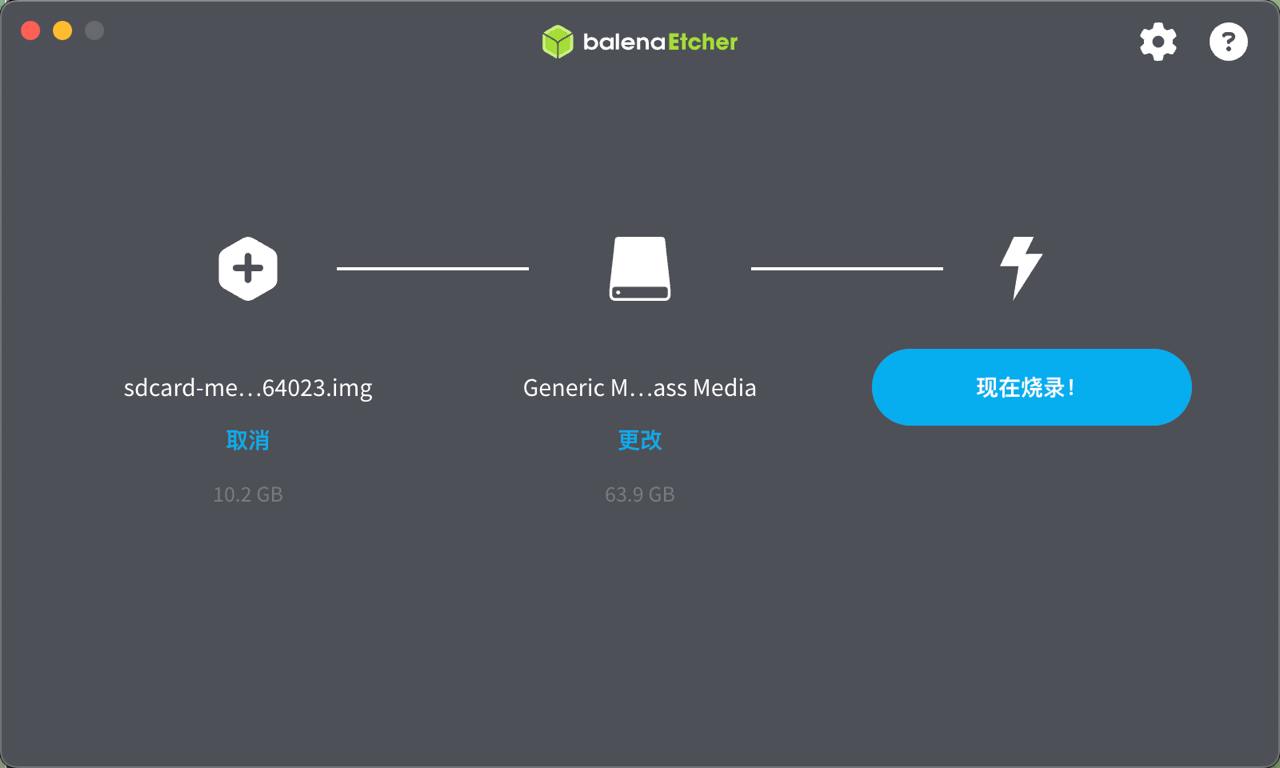
Launch BalenaEtcher and follow the prompts to write the image:
- Click Flash from file and select the image file.
- In the second column, choose the target device.
- Click Flash to start writing.
- Wait until the completion dialog appears.
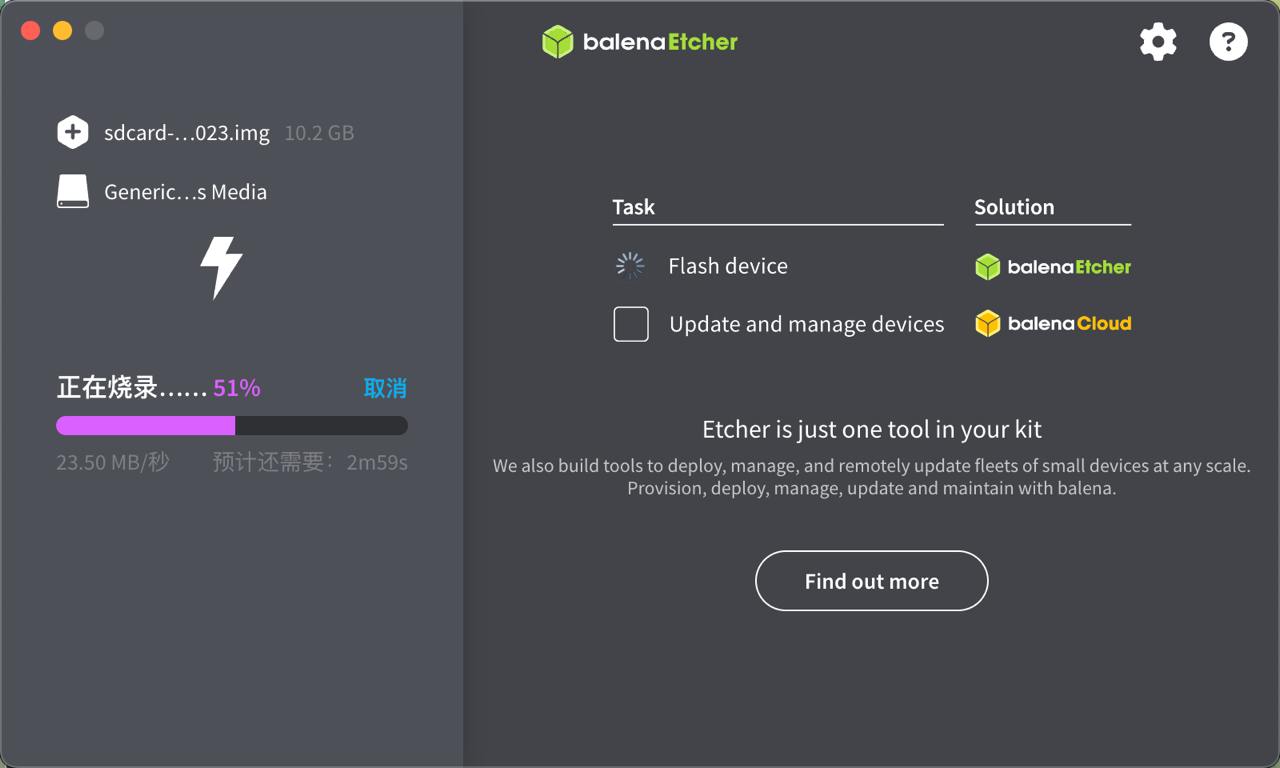
Safe removal reminder
Ensure the BalenaEtcher process has finished and the SD card activity LED has stopped blinking before removing the card. Interrupting power early may corrupt the card or the image.
Writing with dd
dd is a powerful command-line utility for copying data with explicit control over block size and format. It is usually pre-installed on Linux systems.
Follow the steps below to write the image with dd.
- Inspect the device list before and after inserting the SD card to determine the device node:
lsblk
Typical SD card devices include /dev/sda or /dev/mmcblk0. In this tutorial the SD card appears as /dev/sda.

- Unmount any mounted partitions before writing. If multiple partitions exist, unmount each one:
sudo umount /dev/sdX1
If nothing is mounted, umount reports not mounted; no further action is required.
- Run
sudo syncto flush pending IO:
![]()
- Write the image. Confirm that the
of=argument references the correct device (replacesdXwith the appropriate value fromlsblk). In this example the device issda:
sudo dd if=./sdcard-lpi4a-20250110_151339.img of=/dev/sdX bs=4M status=progress

Caution when using dd
Always double-check the target device (e.g. /dev/sdX) before executing dd. Selecting the wrong disk—such as your system drive—will cause irreversible data loss. Use lsblk or fdisk -l to verify the device path. After writing, run sudo sync, unmount the SD card, and only then remove it and insert it into the development board.
Booting the System
After writing the image, insert the SD card into the slot shown below.
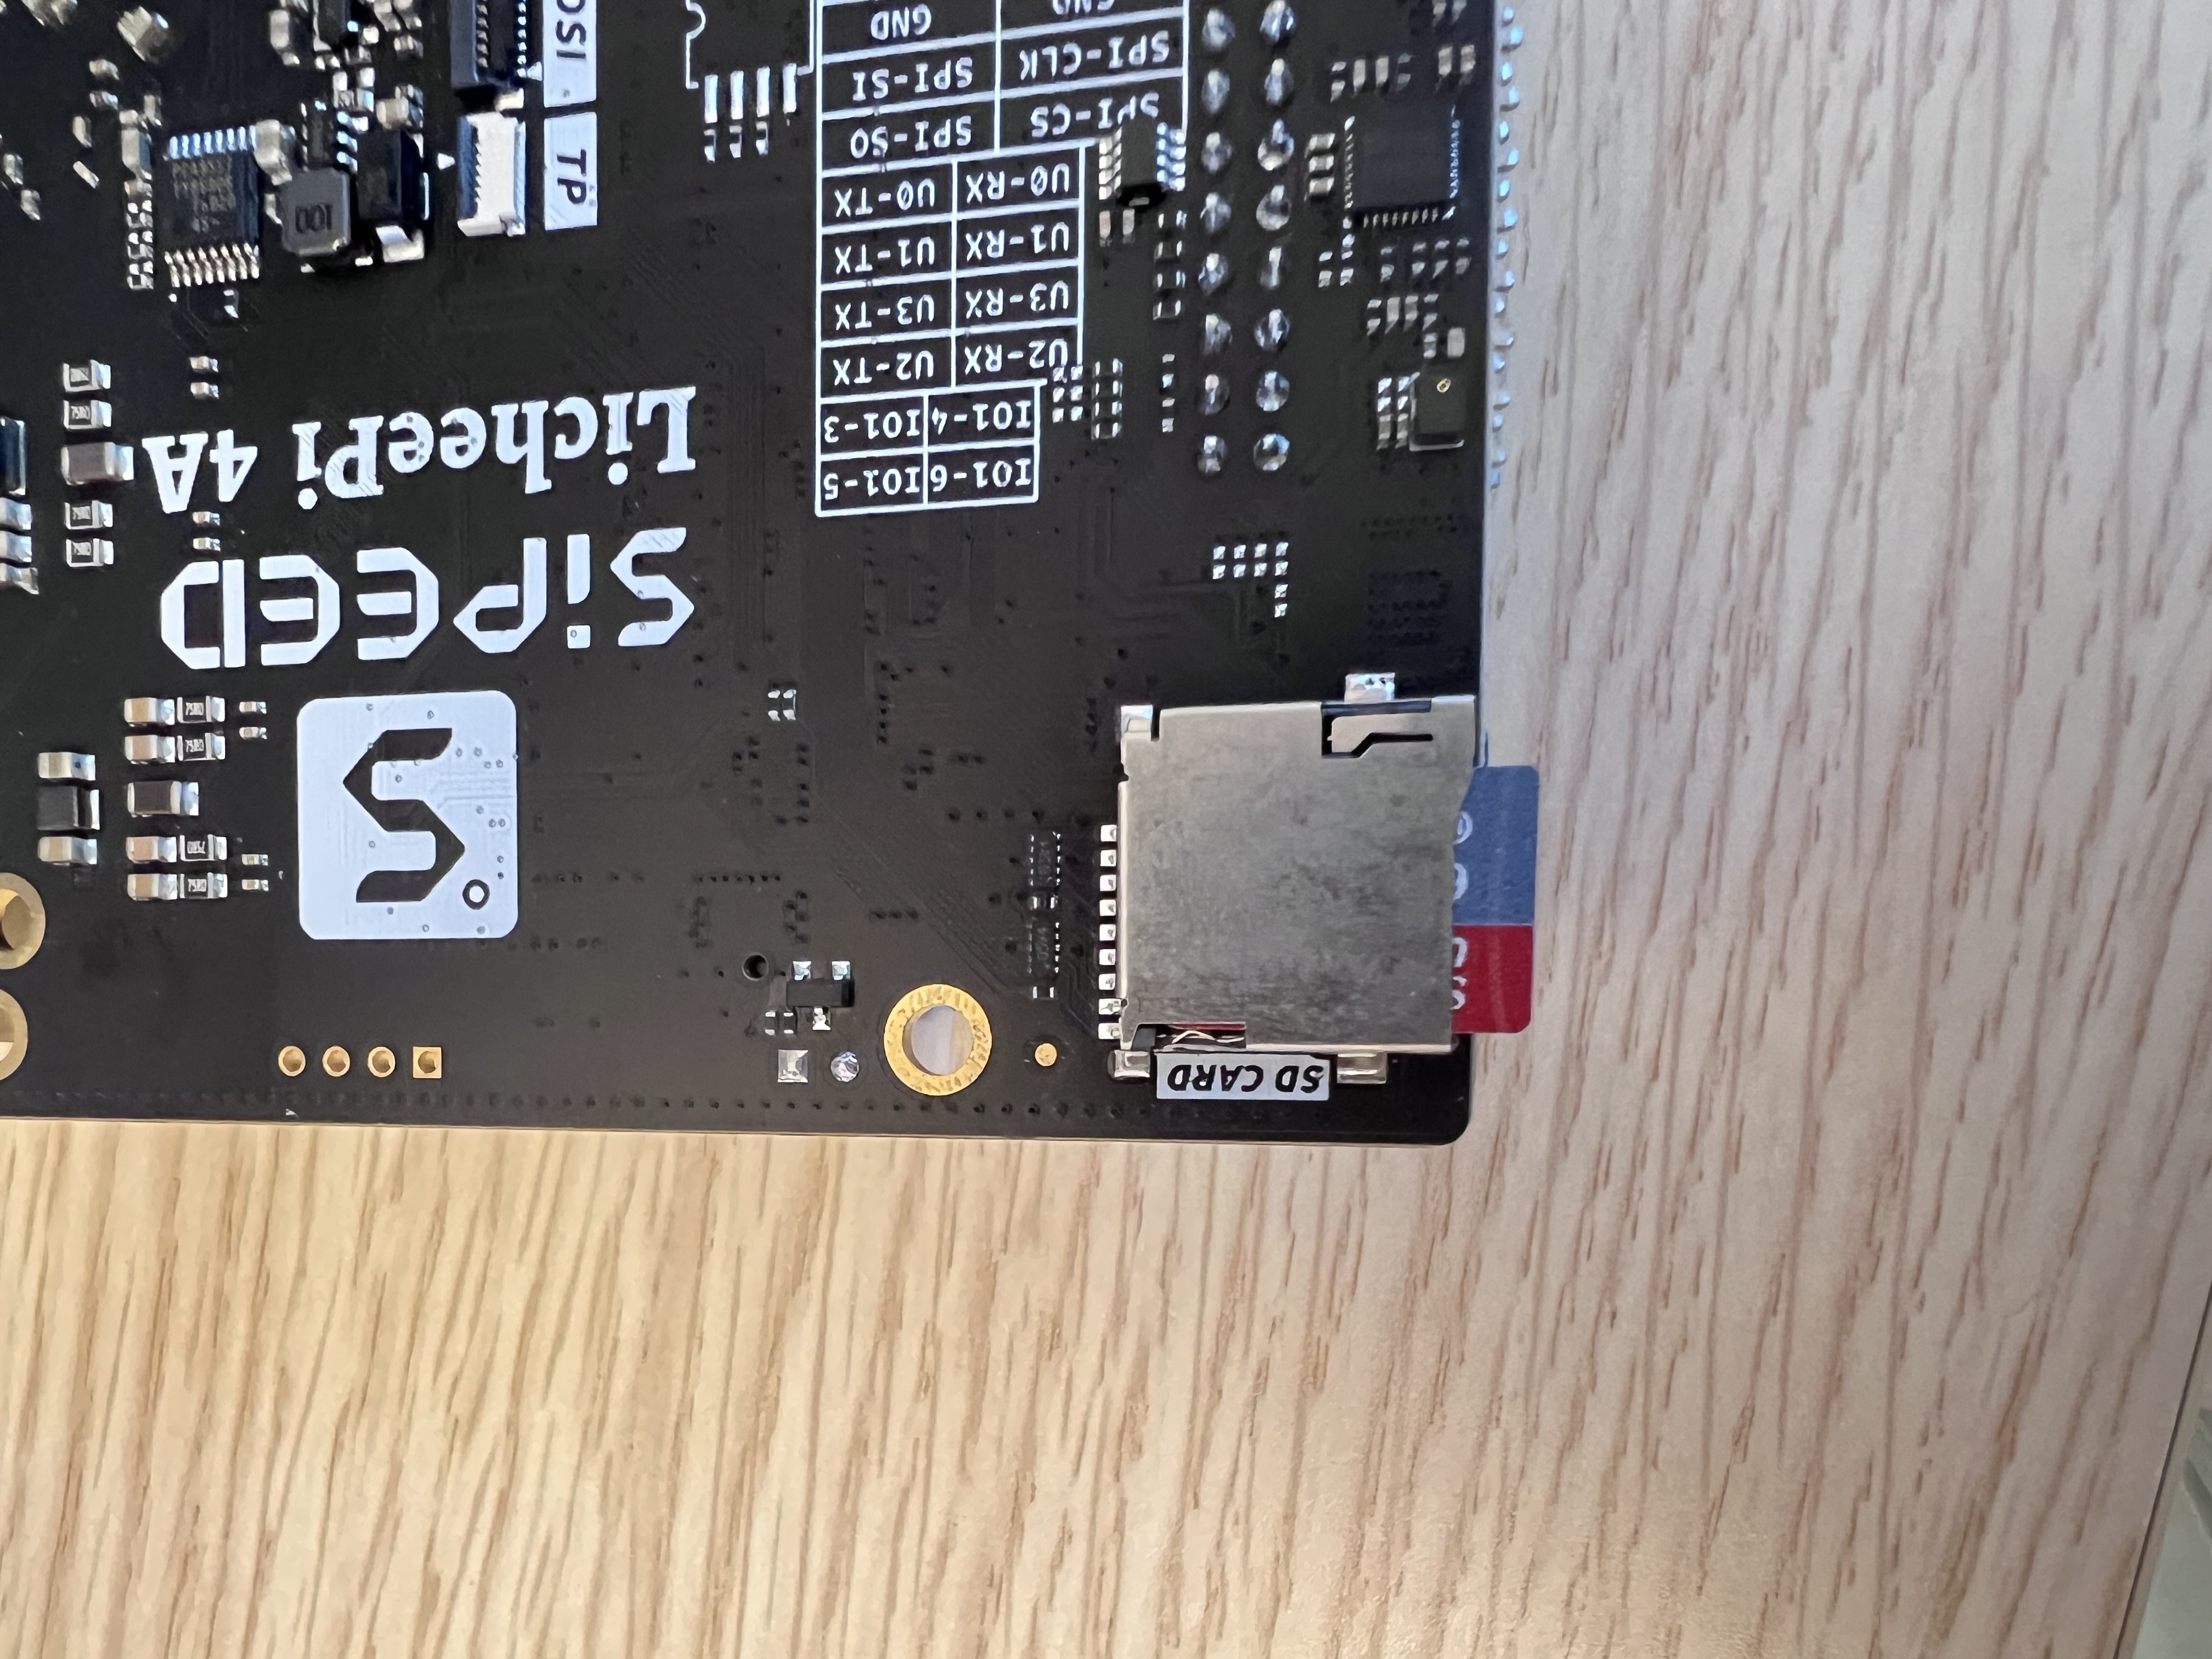
Connect an HDMI cable if you require an external display. Use the supplied USB-A-to-USB-C cable: connect the USB-C end to the board, the USB-A end to a power supply that can provide at least 5 V / 2 A, and the system will boot.
Boot from eMMC
Two procedures are available for flashing the eMMC image: one without a serial console and one with it. Since a serial cable is optional, the default workflow assumes no serial connection, while the serial procedure is provided for users who have a cable.
Remove the SD card before booting from eMMC.
Preparation
Install the Flashing Toolchain
Flashing the eMMC requires writing the u-boot, boot, and root images via the fastboot utility. Verify that fastboot is installed:
fastboot --version

If output similar to the following appears, fastboot is installed:
fastboot version 28.0.2-debian
Installed as /usr/lib/android-sdk/platform-tools/fastboot
If no version info is printed, install fastboot:
sudo apt install fastboot
![]()
Obtain the Images
Download the Lichee Pi 4A system images from the following locations:
- RevyOS 20240720 (Kernel 5.10)
- Latest release (Kernel 6.6): 20251226
About kernel versions
The 20240720 image uses Kernel 5.10, which is stable for video codecs and general workloads.
The latest image uses Kernel 6.6. It may encounter unresolved issues, such as video stutter or USB power loss. Fixes are actively being developed.
Choosing the correct U-Boot firmware
Different memory configurations require different U-Boot binaries. Use the table below to match your core board configuration:
| Memory and storage | U-Boot image |
|---|---|
| 8 GB RAM + 8 GB eMMC | u-boot-with-spl-lpi4a-main_8gemmc.bin |
| 8 GB RAM + 32 GB eMMC | u-boot-with-spl-lpi4a-main.bin |
| 16 GB RAM | u-boot-with-spl-lpi4a-16g-main.bin |
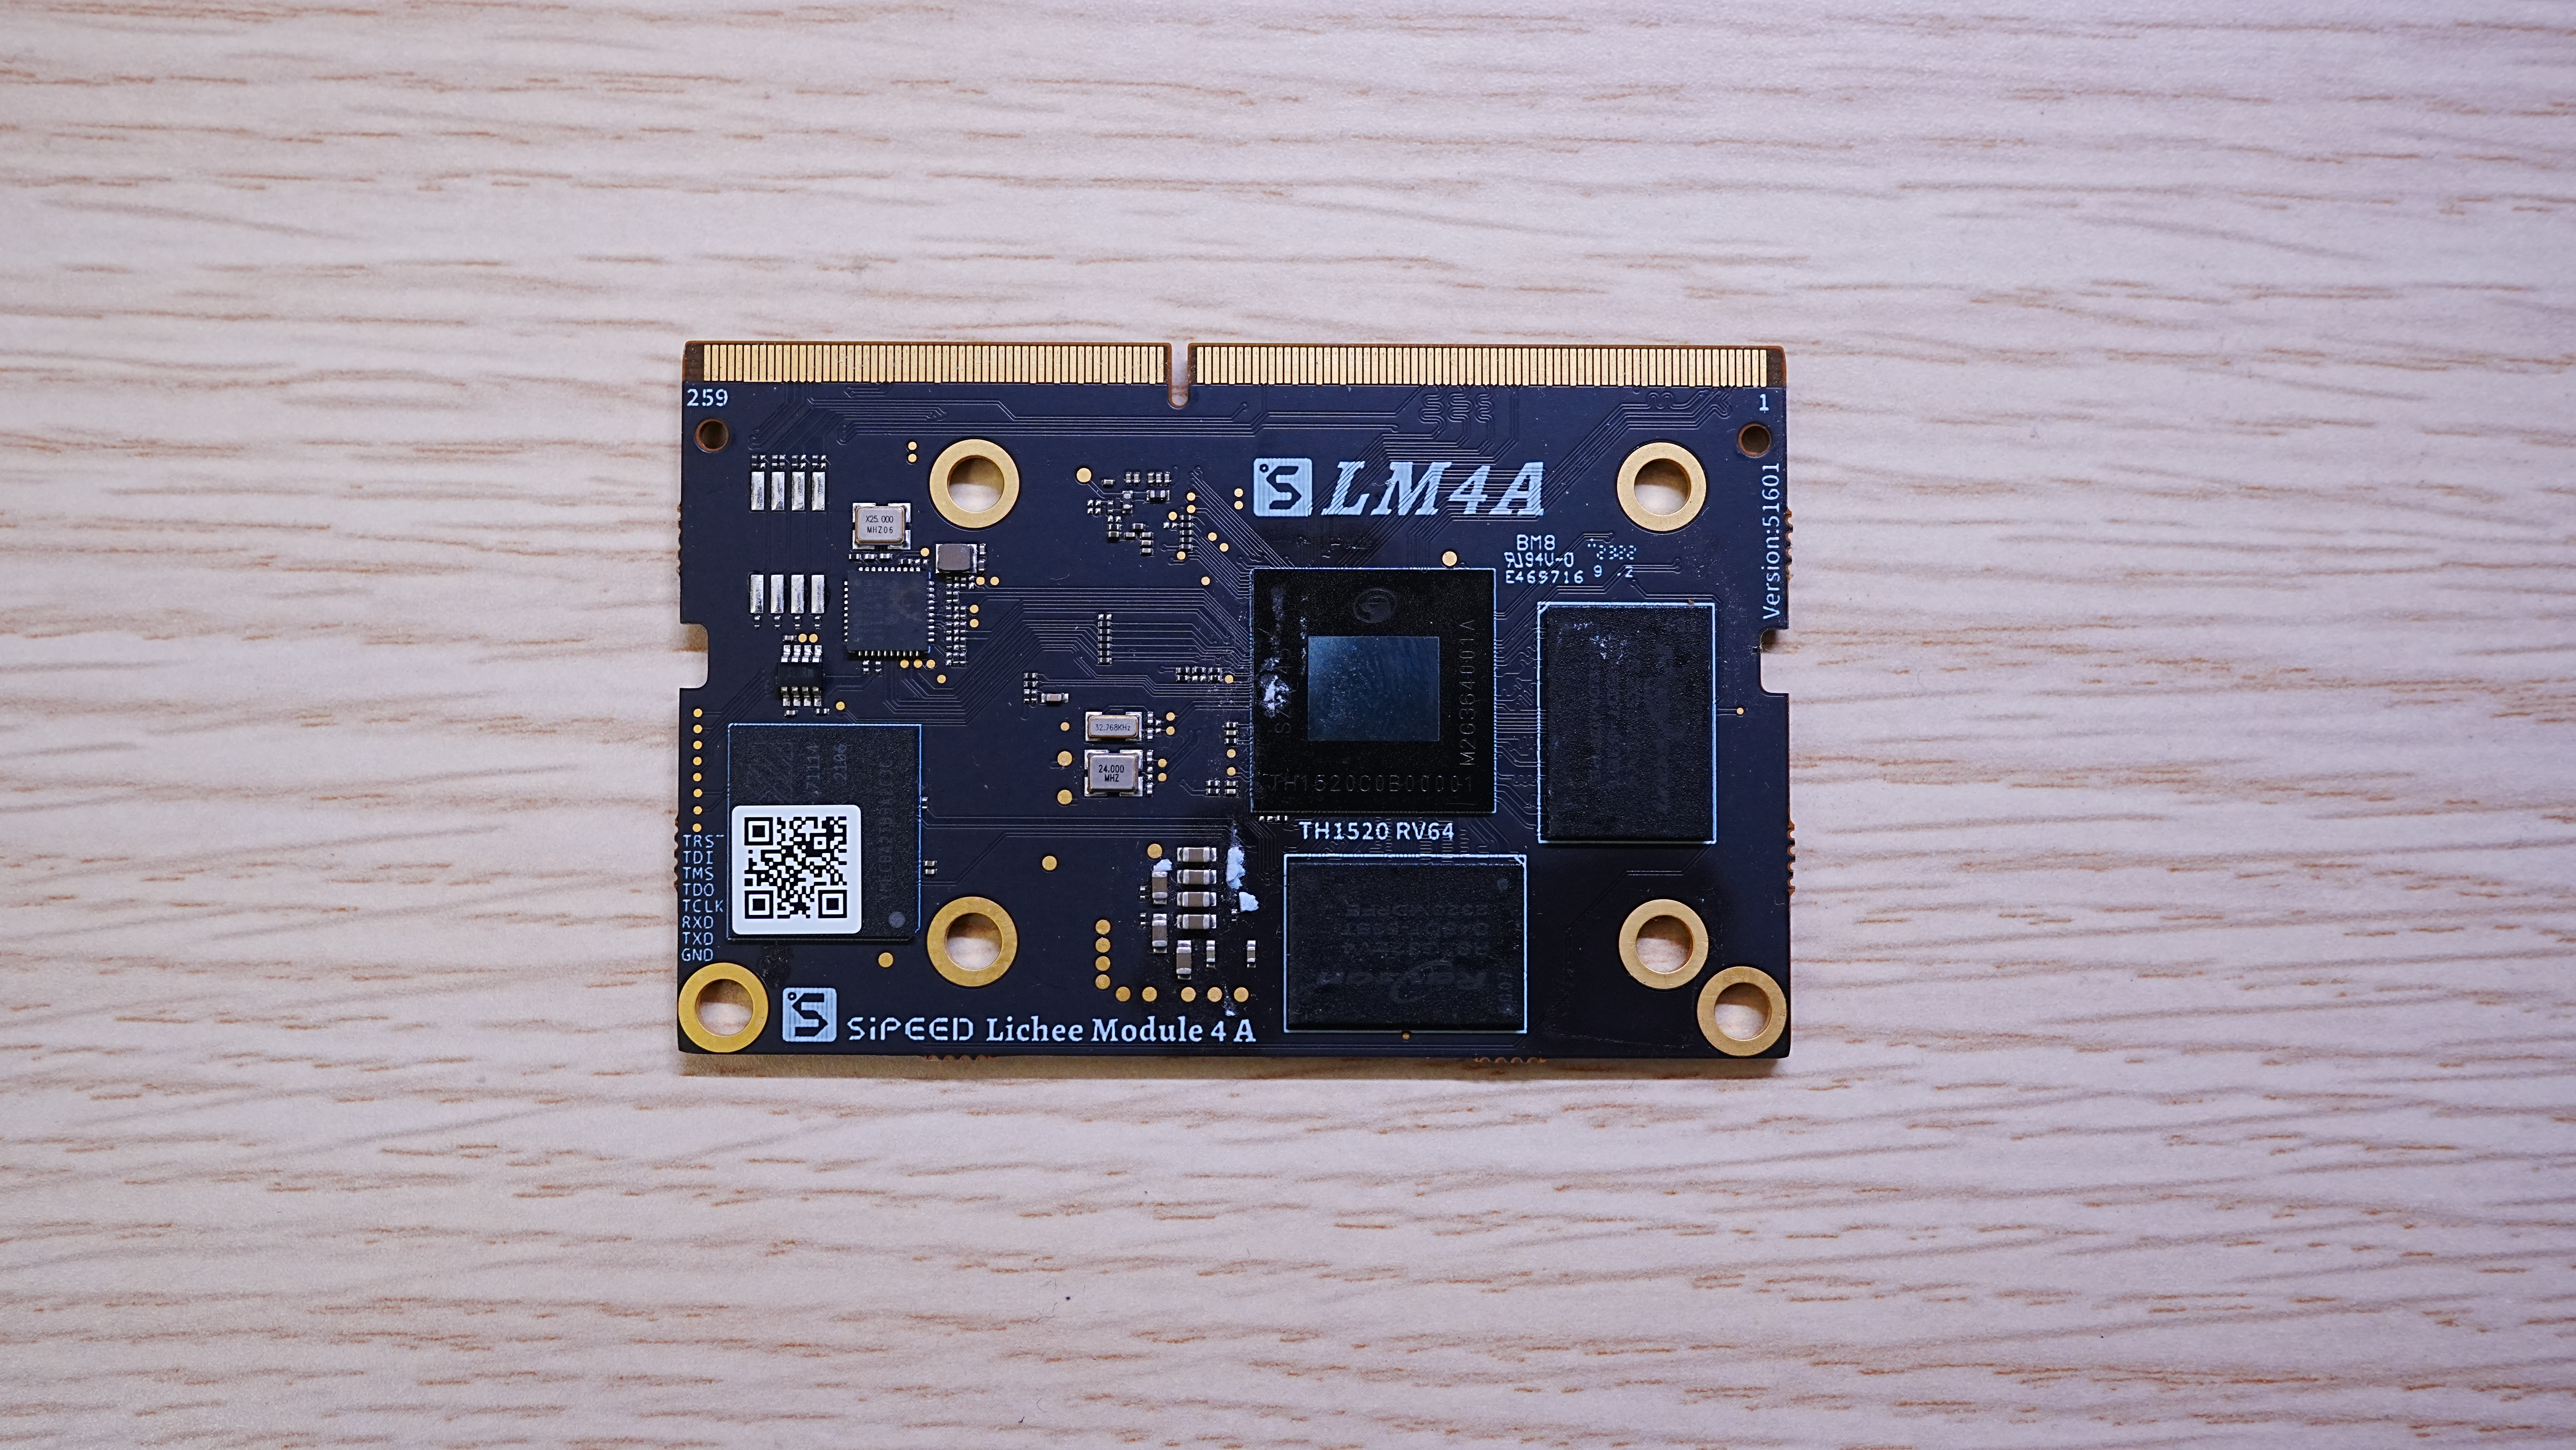
If you are unsure about the configuration, scan the QR code sticker on the core board. When the board ships, stickers are attached to both the core board and the baseboard. Scanning the core board sticker reveals the RAM and storage specification.
Example for a 16 GB RAM + 128 GB eMMC configuration:
Scanning the QR code yields:
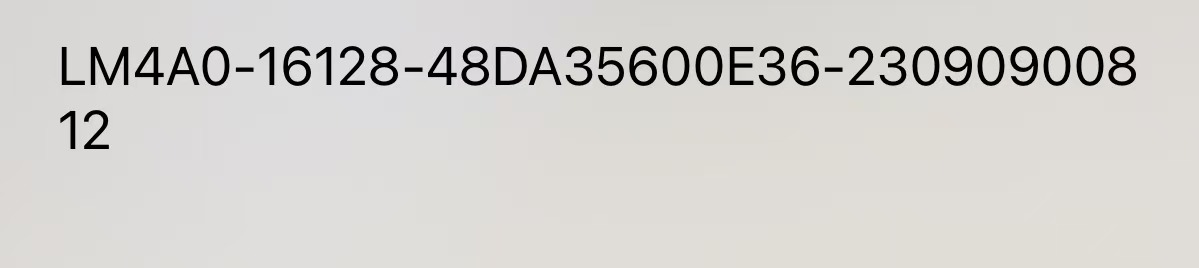
The second line lists the RAM plus storage configuration.
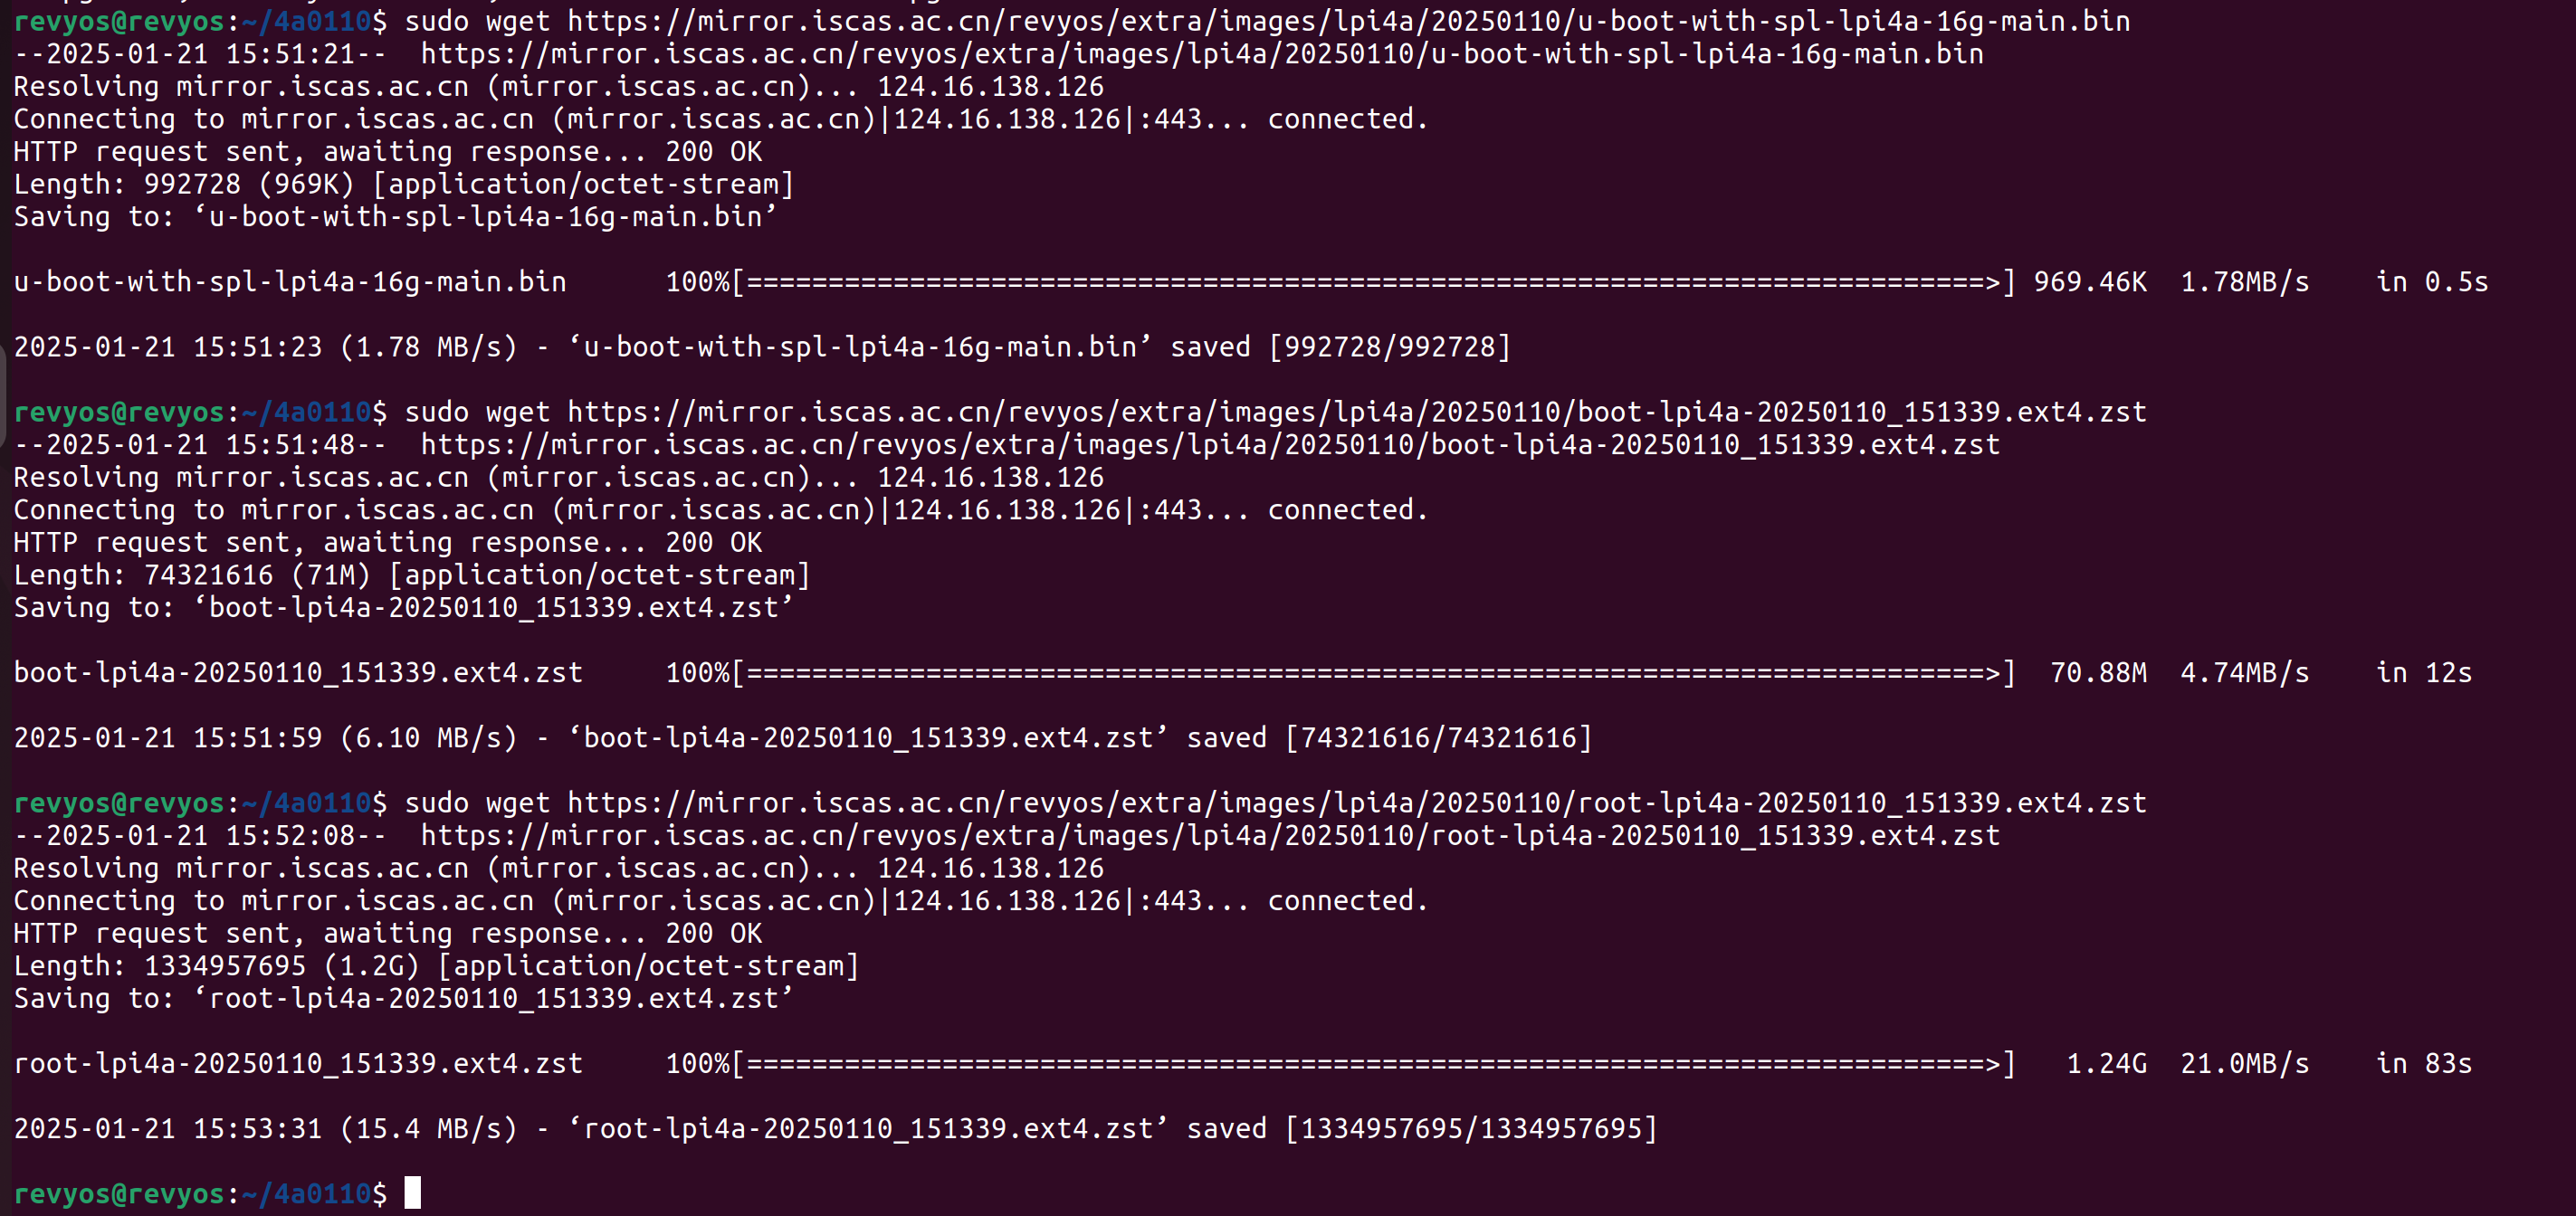
After confirming the board specification, download the U-Boot, boot, and root images with wget:
sudo wget https://mirror.iscas.ac.cn/revyos/extra/images/lpi4a/20250110/u-boot-with-spl-lpi4a-16g-main.bin
sudo wget https://mirror.iscas.ac.cn/revyos/extra/images/lpi4a/20250110/boot-lpi4a-20250110_151339.ext4.zst
sudo wget https://mirror.iscas.ac.cn/revyos/extra/images/lpi4a/20250110/root-lpi4a-20250110_151339.ext4.zst
Extract the boot and root archives with unzstd:
unzstd boot-lpi4a-20250110_151339.ext4.zst
unzstd root-lpi4a-20250110_151339.ext4.zst
After extraction, the required files for flashing the eMMC are ready.

Writing the eMMC Image (No Serial Console)
Press and hold the BOOT button on the board and connect it to the computer. The board enters flashing mode.
Use lsusb to verify the connection:
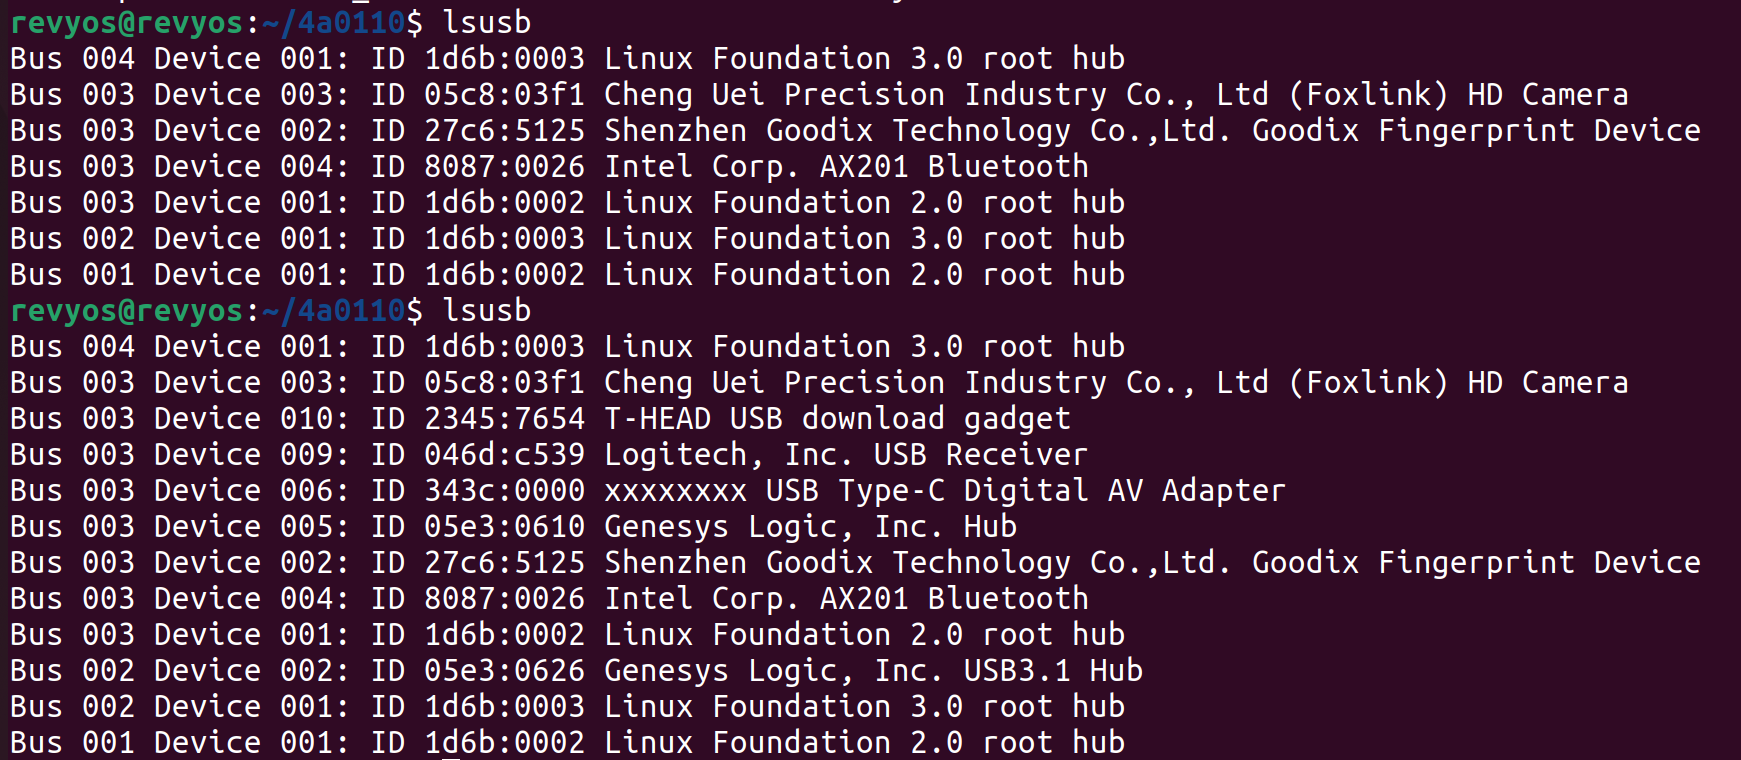
A successful connection appears as ID 2345:7654 T-HEAD USB download gadget.
After confirming the connection, flash a temporary U-Boot to RAM and reboot:
fastboot flash ram u-boot-with-spl-lpi4a-16g.bin # Replace with the U-Boot image for your configuration
fastboot reboot
sleep 1
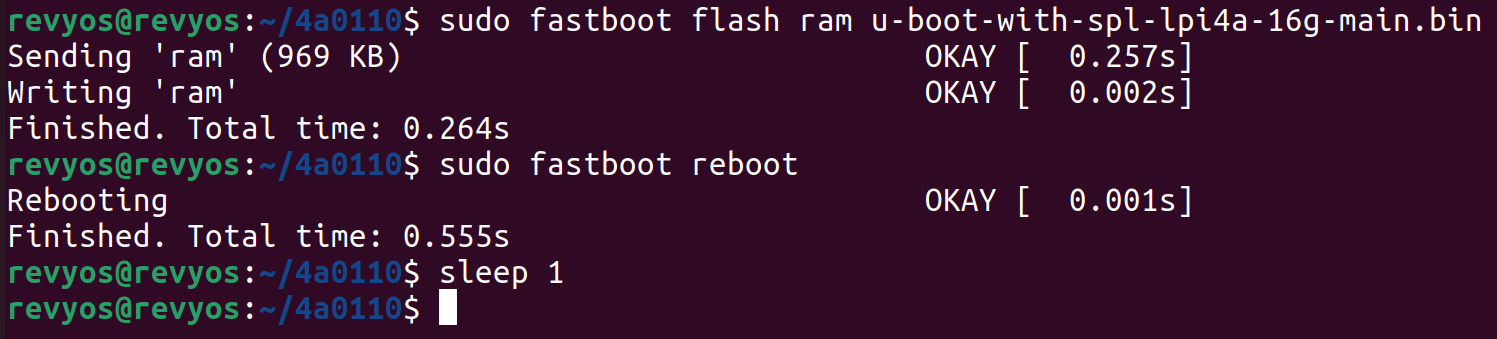
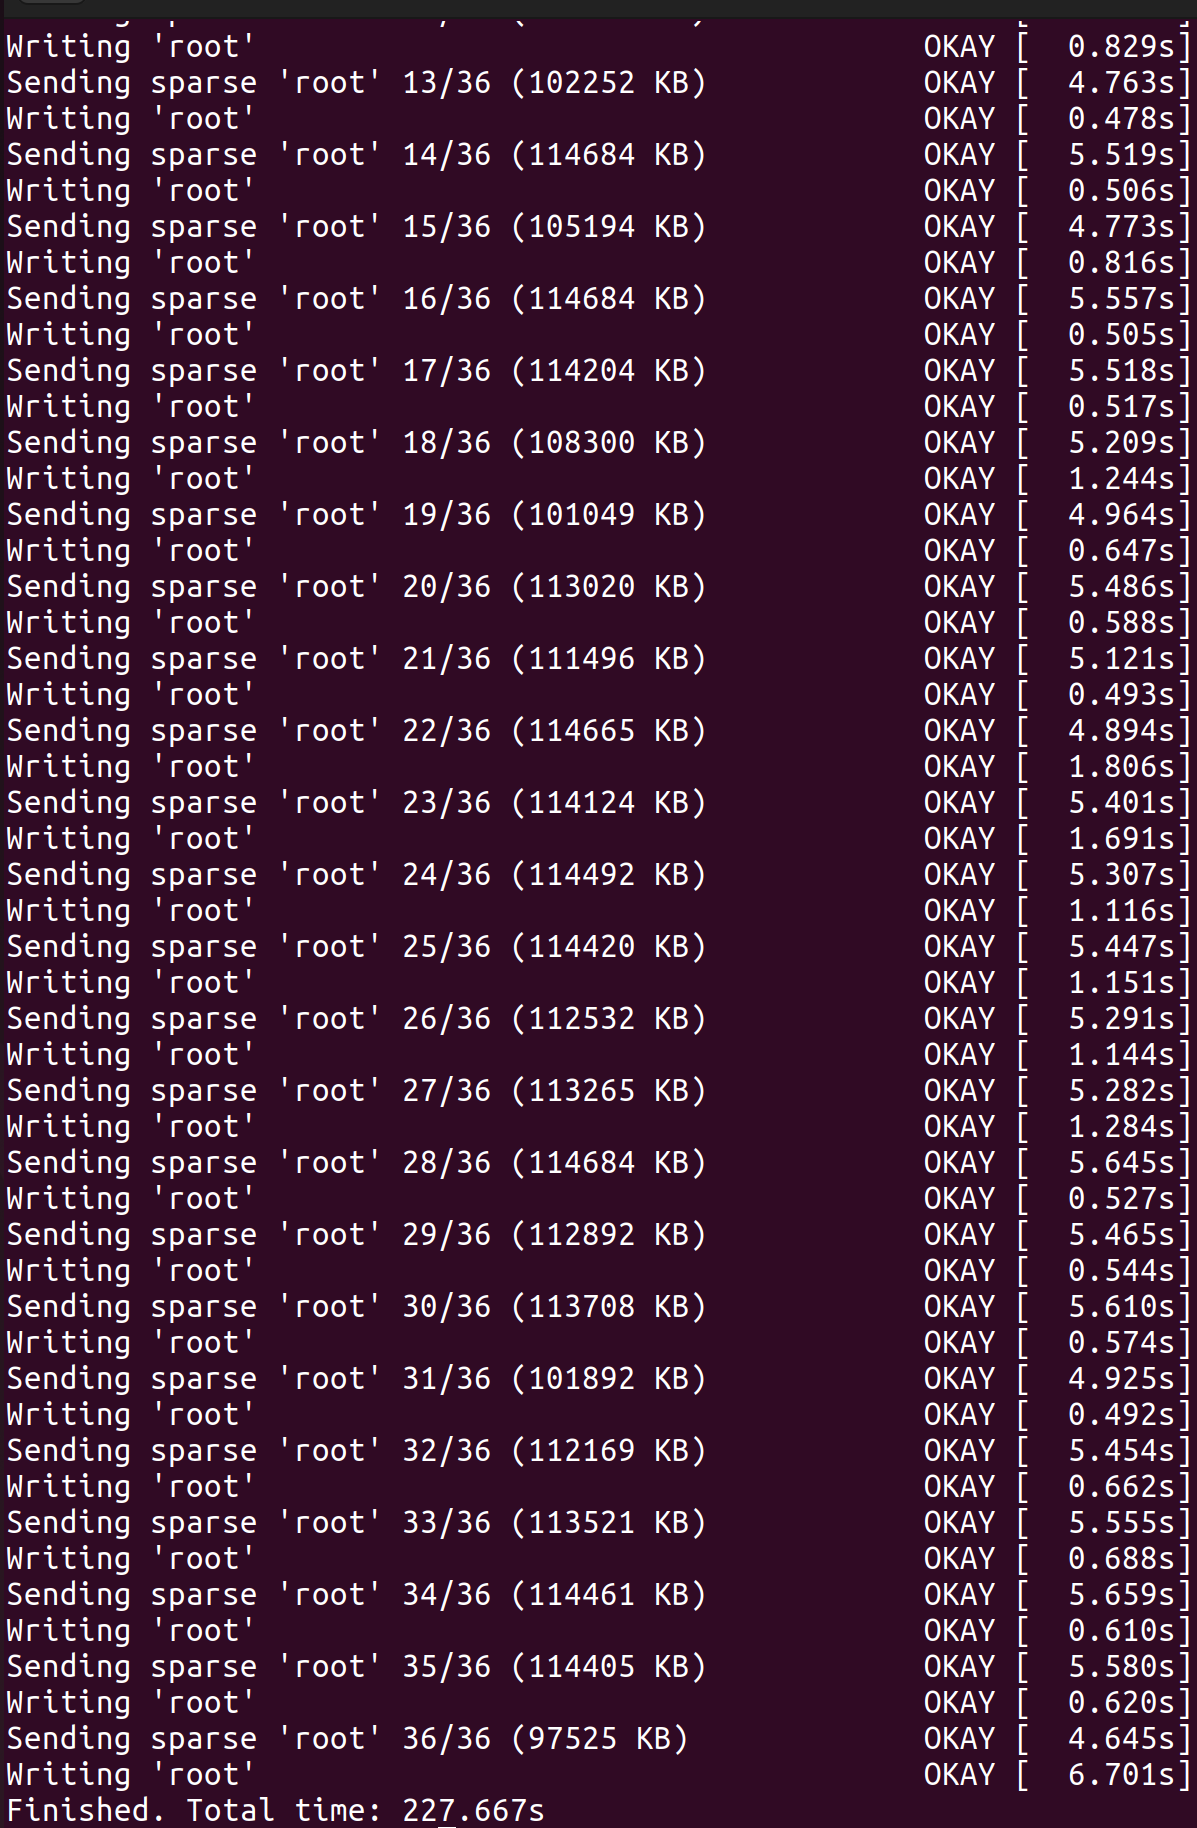
Next, flash the persistent images:
fastboot flash uboot u-boot-with-spl-lpi4a-16g.bin
fastboot flash boot boot-lpi4a-20240720_171951.ext4
fastboot flash root root-lpi4a-20240720_171951.ext4
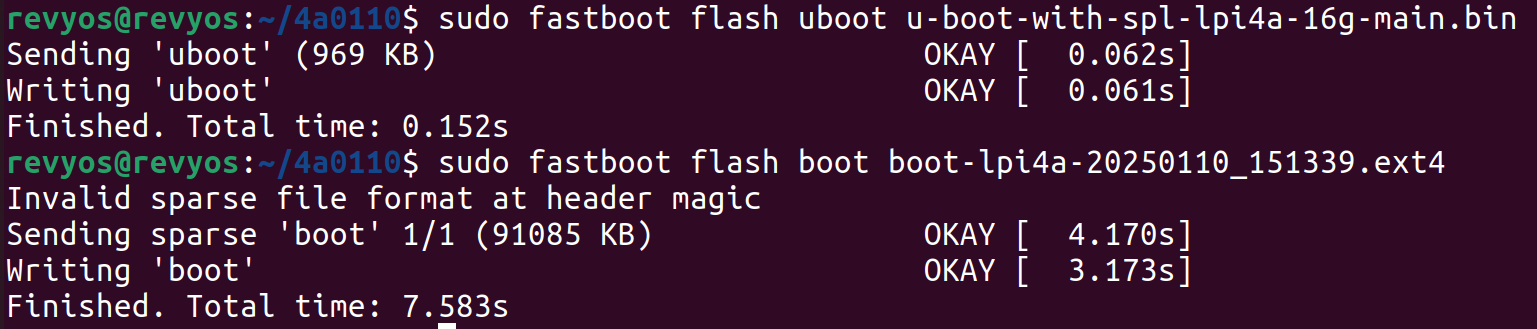
Progress and timing note
Flashing uboot and boot completes quickly. Writing root requires roughly five minutes. If the number of data blocks reported during the root flash is unexpectedly small (e.g. only in the low thousands), earlier steps likely failed—repeat the flashing process.
Flashing is now complete. Power-cycle the board to boot into the system.
Writing the eMMC Image (With Serial Console)
Install a Serial Console Tool
When using a serial connection, a terminal program is required for monitoring. Tools such as minicom, screen, and picocom are suitable; this guide uses minicom.
sudo apt install minicom
![]()
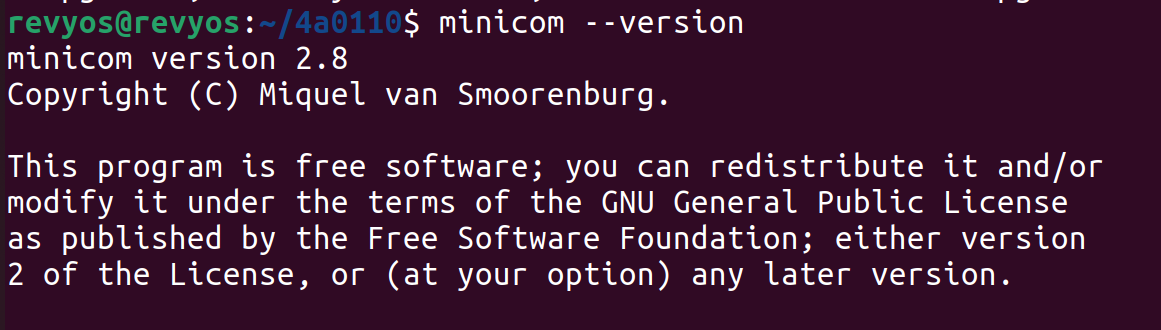
Verify the installation by checking its version:
minicom -version
Using minicom
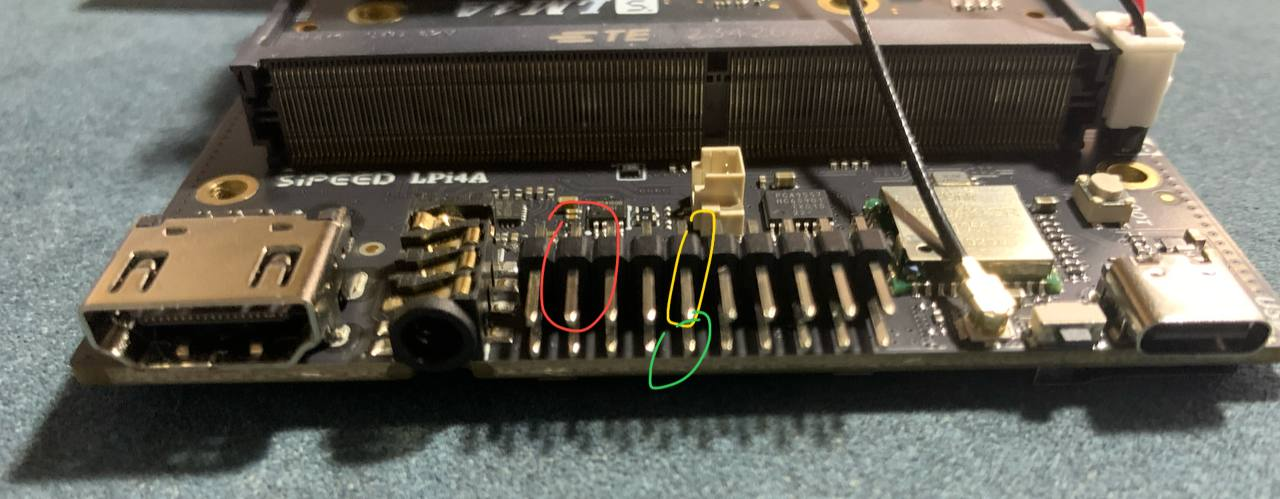
Wire the serial adapter to the board as illustrated below. Connect the USB side to the host computer. The board’s USB Type-C port is connected by a USB Type-C cable.
GND corresponds to the red circle (first row, second pin from the left), TX to the yellow circle (first row, fifth pin), and RX to the green circle (second row, fifth pin). Connect TX to RX, RX to TX, and GND to GND.
Determine the serial device by listing /dev/tty* before and after plugging in the adapter:
ls /dev/tty*
After connecting the adapter, an additional entry such as /dev/ttyUSB0 appears.

Start minicom, specifying the device and baud rate (115200 in this example):
sudo minicom -D /dev/ttyUSB0 -b 115200

Enter Fastboot
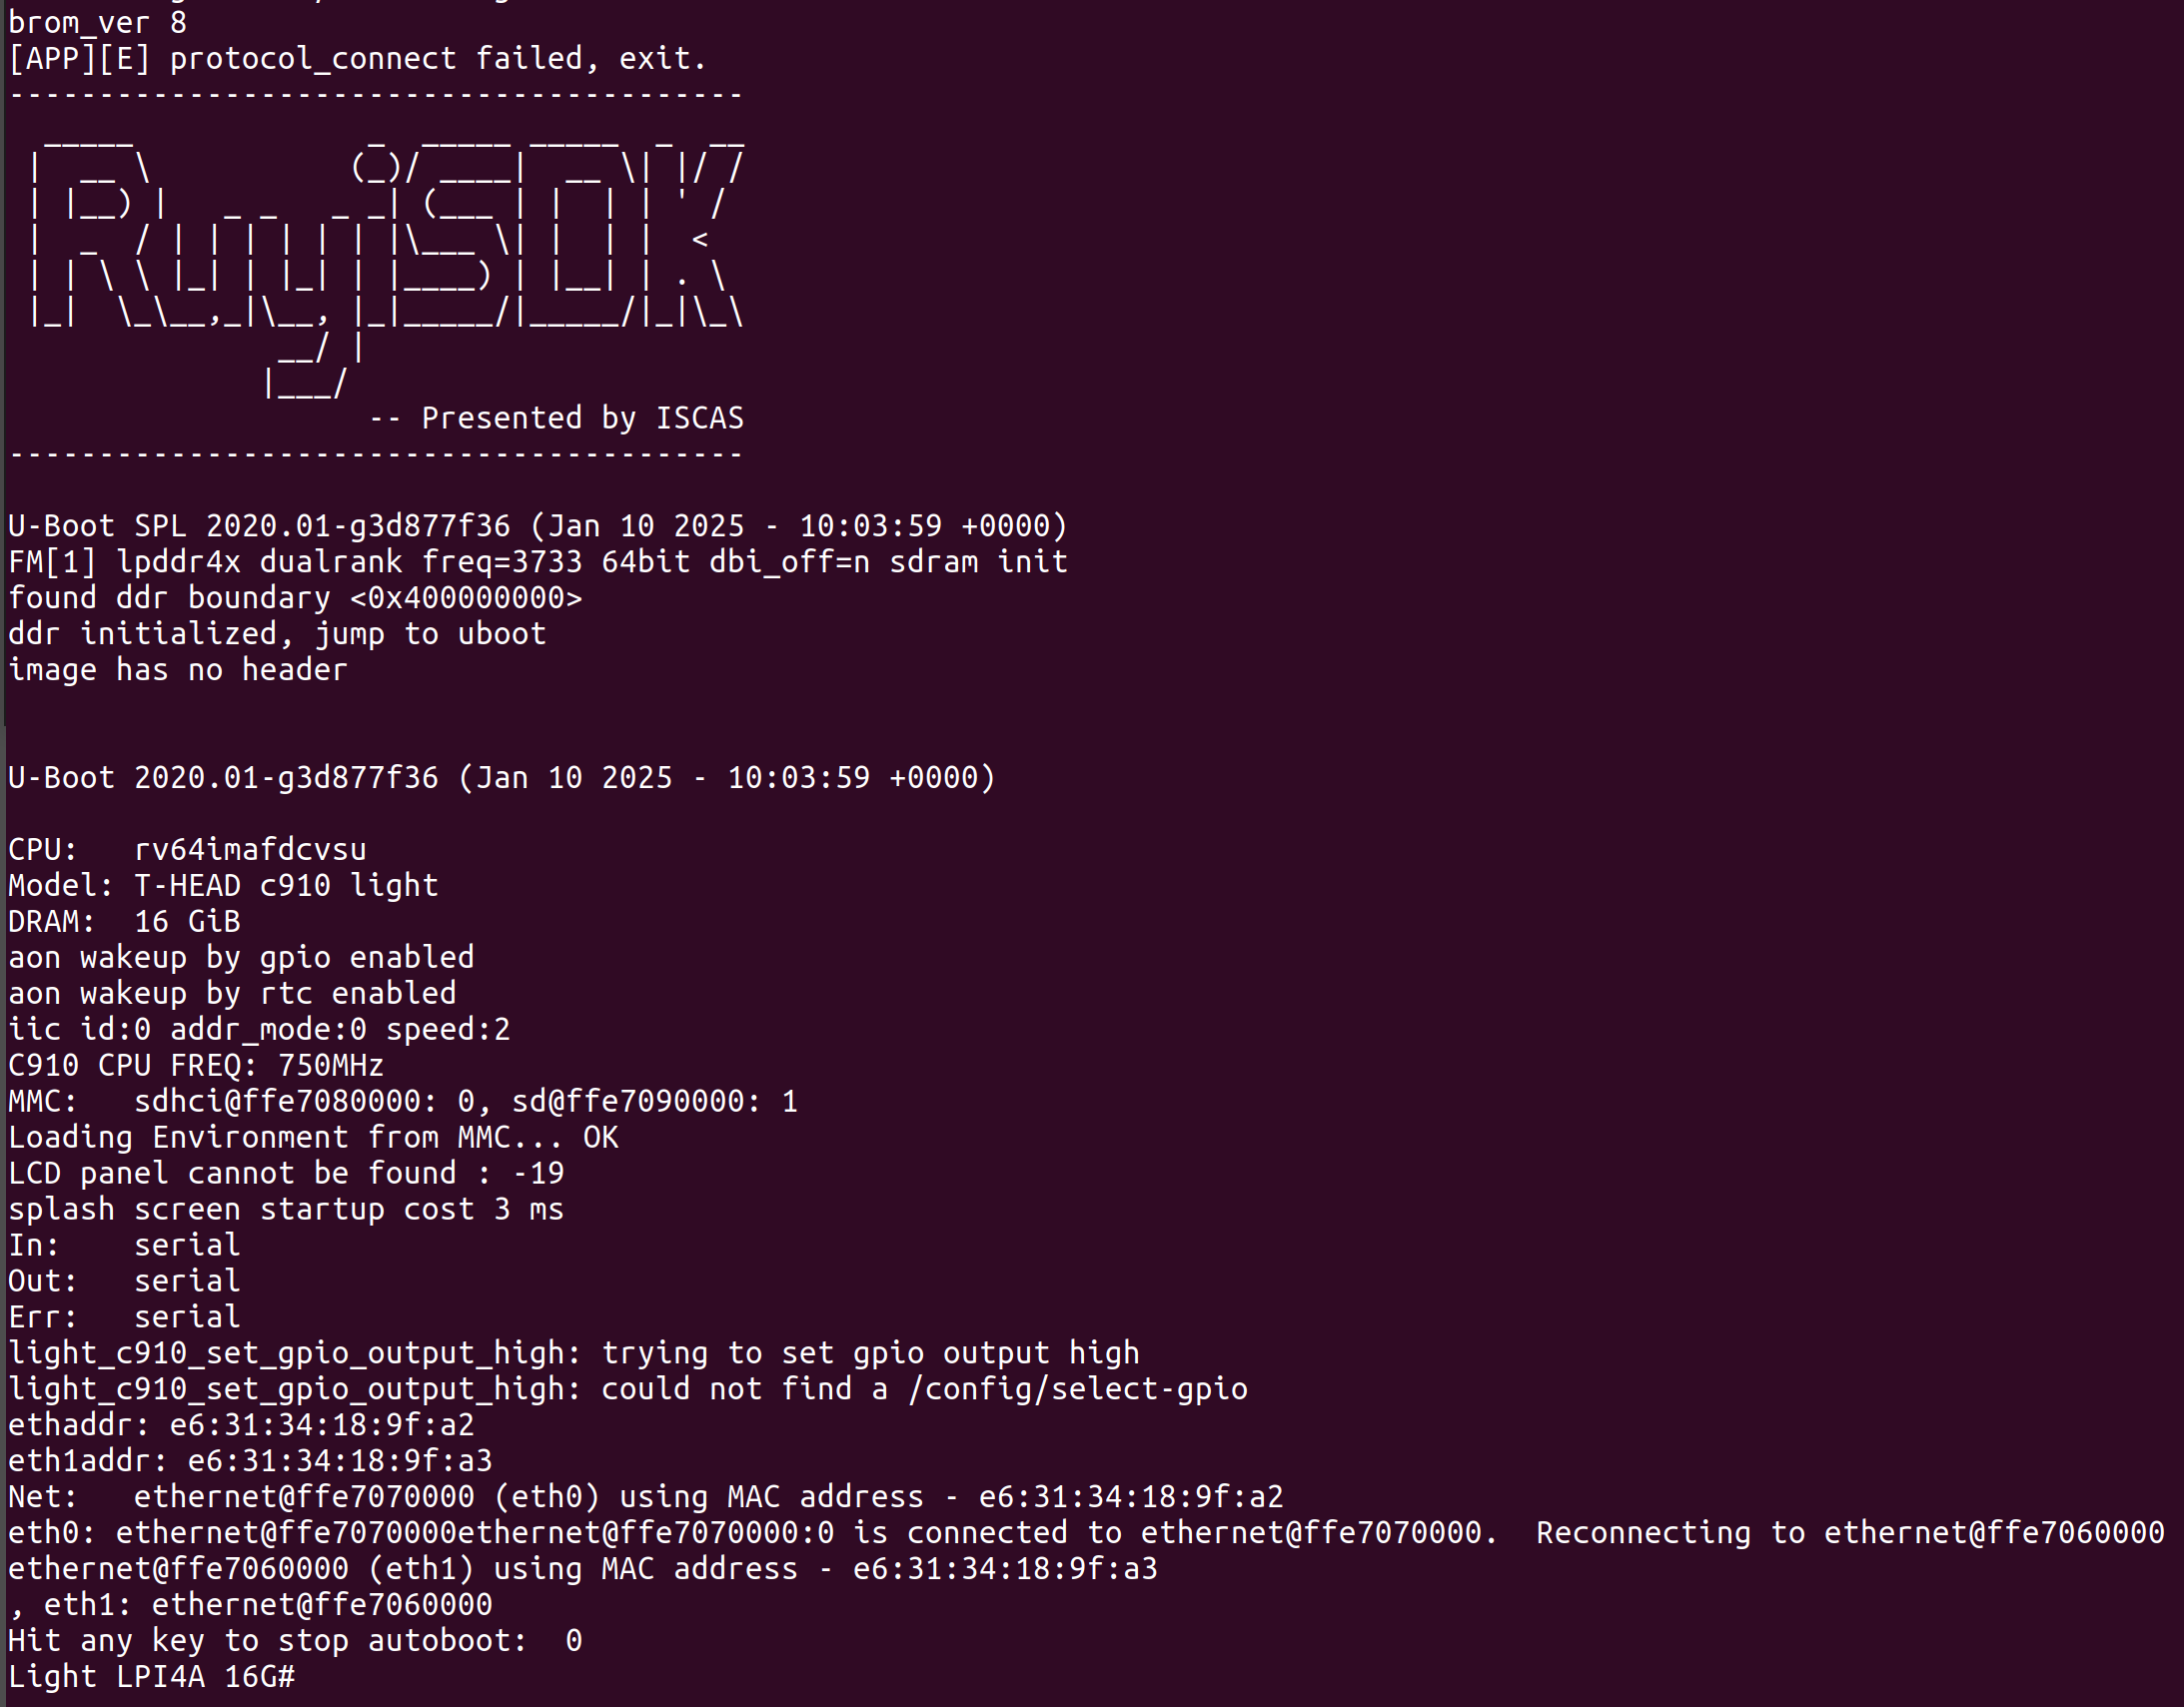
Once minicom is running, connect the USB Type-C cable to power the board. On the serial console, interrupt the boot process when Hit any key to stop autoboot appears (the countdown lasts about three seconds). The U-Boot command line is then presented.
Enter the following command in the serial console:
fastboot usb 0
You should see output similar to:
Light LPI4A 16G# fastboot usb 0
dwc3_gadget_start maximum_speed:5 revision:0x5533330b
dwc3_gadget_start DWC3_DCFG:0x80804
dwc3_gadget_start_conndone_interrupt speed:0 dwc3_dsts:0x20000
dwc3_gadget_start_conndone_interrupt speed:0 dwc3_dsts:0x2f938

This indicates that fastboot is ready. Open another terminal to execute the flashing commands.
Flash the Images
Run the following commands in the directory where the image files were downloaded. If you execute them elsewhere, adjust the file paths accordingly.
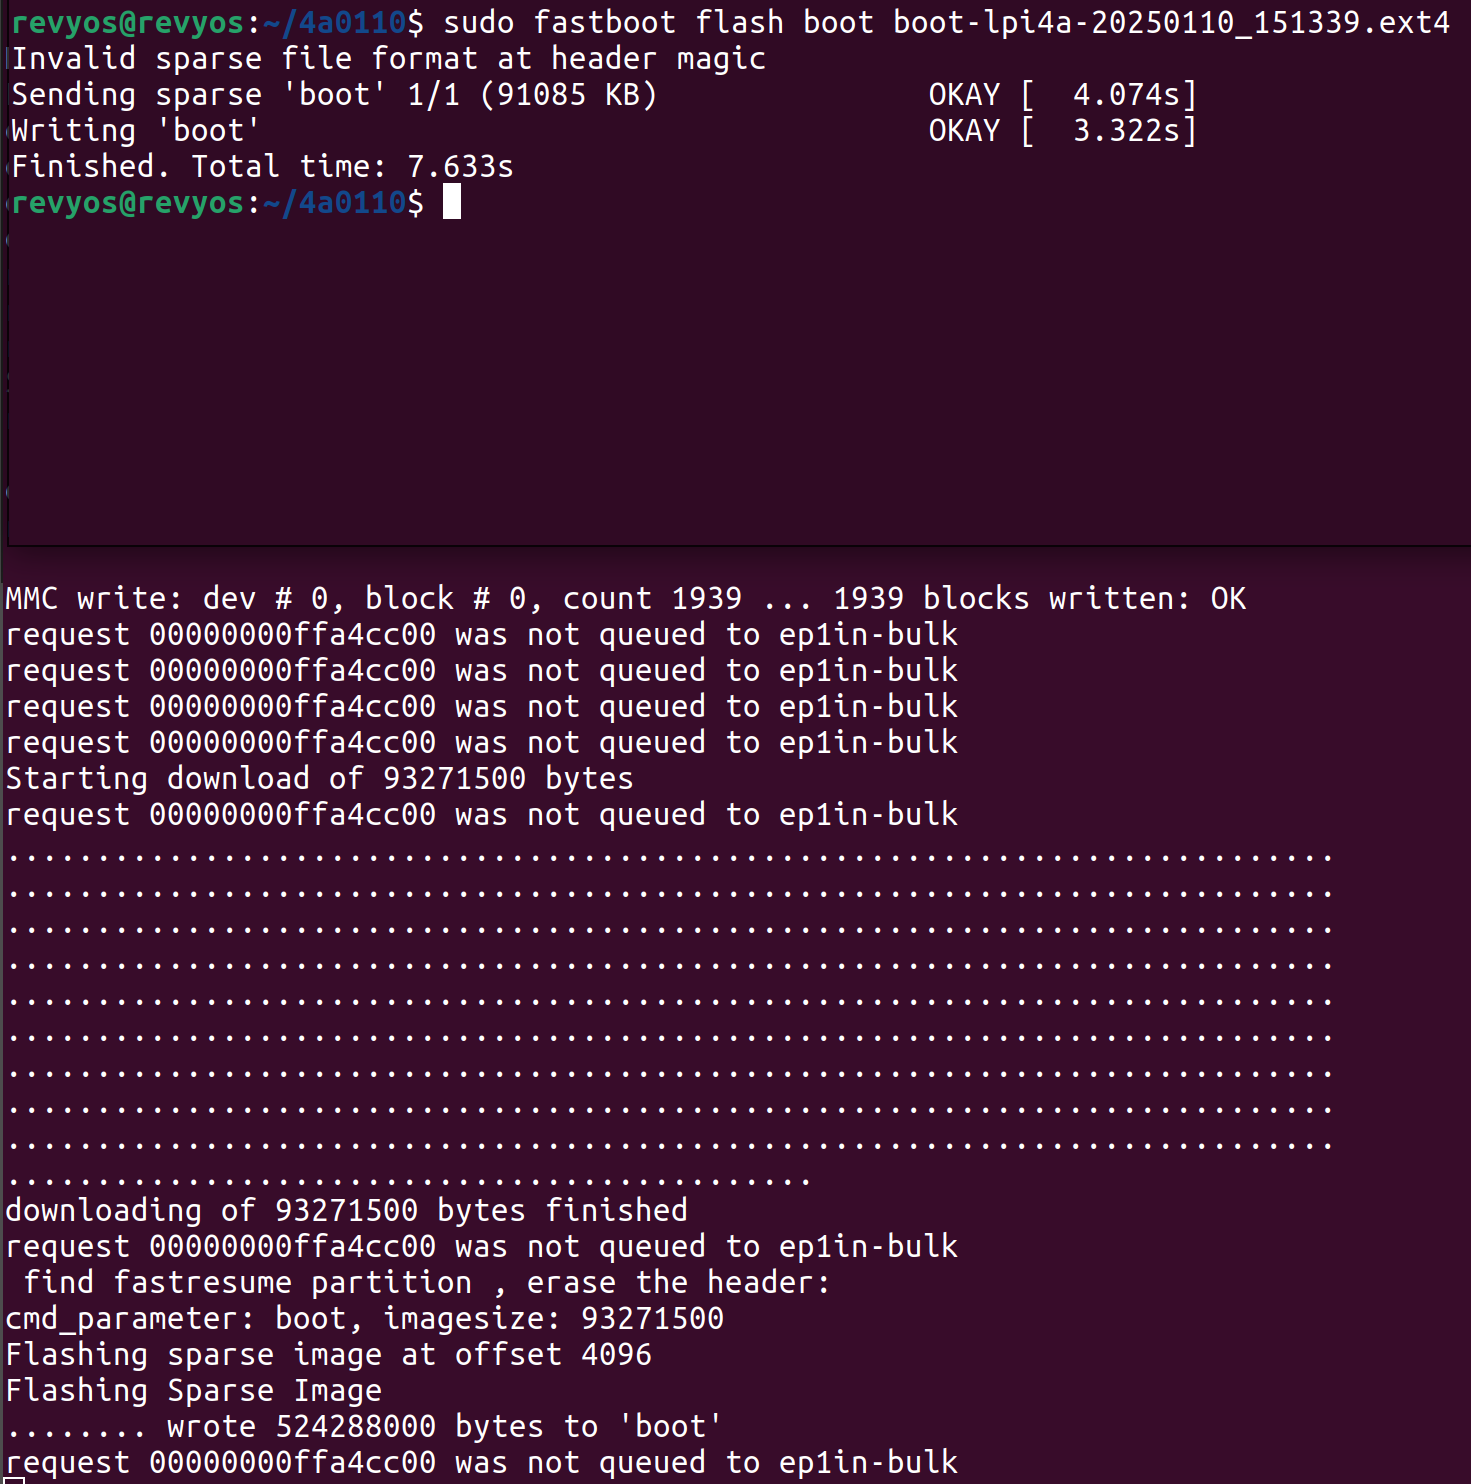
fastboot flash uboot u-boot-with-spl-lpi4a-16g.bin
fastboot flash boot boot-lpi4a-20240720_171951.ext4
fastboot flash root root-lpi4a-20240720_171951.ext4
fastboot reports progress. If the serial console is connected, detailed logs are visible there—for example, when flashing boot (92,886,476 bytes), the log shows cmd_parameter: boot, imagesize: 92886476.
After flashing, disconnect the USB Type-C cable linking the board and the host, connect a power cable, and the system will boot automatically.
Troubleshooting
Linux: < waiting for any device >
If lsusb lists the download gadget but fastboot remains at < waiting for any device >, rerun the command with sudo.

Issues After Major Upgrades
If problems occur after a major upgrade, the U-Boot environment may need to be reset.
Reset procedure: Connect to the board via serial, power it on, interrupt U-Boot, and run:
env default -a -f; env save; reset
This resets all environment variables and reboots the board.
If the partition layout differs from the previous image, additionally run run gpt_partition.
User Credentials
Default login credentials are:
- Username:
debian - Password:
debian
Use these for first boot. For security, change the password immediately after logging in.