Deploying YOLOX on LicheePi 4A and Inference Using HHB-onnxruntime
This article provides a detailed guide on how to deploy the YOLOX object detection model on LicheePi 4A and perform efficient inference using HHB-onnxruntime.
YOLOX Introduction
YOLOX is an efficient object detection algorithm that offers excellent speed performance while maintaining high accuracy, making it very suitable for deployment on edge devices.
1. Environment Preparation
1.1 Hardware Preparation
- LicheePi 4A (LPi4A) development board
- MicroSD card (for storing the system)
- Power adapter
- USB serial debug tool (optional)
1.2 Software Preparation
- LicheePi 4A official Linux system
- Python 3.11
- pip and necessary dependencies
- ONNX runtime (onnxruntime)
- HHB tools (can be used for model conversion)
- YOLOX model and its ONNX version
# Update system
sudo apt update && sudo apt upgrade -y
Install some software for later use in the example
sudo apt install wget git vim
Install SHL library
wget https://github.com/T-head-Semi/csi-nn2/releases/download/v2.4-beta.1/c920.tar.gz

tar xf c920.tar.gz

cp c920/lib/* /usr/lib/riscv64-linux-gnu/ -rf
Python Environment Configuration The LPi4A system comes with Python 3.11 pre-installed. You can confirm this with the following command
python3 --version
The following examples all use Python 3.11. If you're using a different version, you'll need to modify the commands accordingly when installing dependencies. Most Python dependencies can be installed using pip. You can install pip with the following command
apt install python3-pip
Before installing other Python packages, first install the venv package to create a Python virtual environment
apt install python3.11-venv
Create and activate a Python virtual environment
cd /root
python3 -m venv ort
source /root/ort/bin/activate
At this point, the basic Python environment has been set up. Similar to other architectures, you can directly install pure Python packages via pip install.
Install OpenCV
sudo apt install python3 python3-pip
sudo apt install python3-opencv
sudo apt install libqt5gui5-gles
2. Obtain and Convert the YOLOX Model
Execute the following steps on LPi4A:
# Clone the YOLOX repository
git clone https://github.com/Megvii-BaseDetection/YOLOX.git

cd YOLOX/demo/ONNXRuntime

wget https://github.com/Megvii-BaseDetection/YOLOX/releases/download/0.1.1rc0/yolox_s.onnx
Modify the Source Code
This tutorial will use HHB-onnxruntime to execute the model. In the onnxruntime example directory of the source code, modify the file demo/ONNXRuntime/onnx_inference.py by adding two lines at the beginning
#!/usr/bin/env python3
# Copyright (c) Megvii, Inc. and its affiliates.

+import sys
+sys.path.insert(0, "../../")

import argparse
import os
The code uses sys.path.insert to specify the search path, thus avoiding the need to install the YOLOX package from the source code.
Install Dependency Packages
The Python ecosystem for the RISC-V architecture is still lacking. In the future, when it's more complete, the dependencies in YOLOX can be installed directly through the requirements.txt file. The YOLOX example in this tutorial depends on many Python packages. Download the pre-compiled Python packages
git clone -b python3.11 https://github.com/zhangwm-pt/prebuilt_whl.git
cd prebuilt_whl
You can process them manually in the following order.
pip install numpy-1.25.0-cp311-cp311-linux_riscv64.whl

pip install opencv_python-4.5.4+4cd224d-cp311-cp311-linux_riscv64.whl

pip install kiwisolver-1.4.4-cp311-cp311-linux_riscv64.whl

pip install Pillow-9.5.0-cp311-cp311-linux_riscv64.whl

pip install matplotlib-3.7.2.dev0+gb3bd929cf0.d20230630-cp311-cp311-linux_riscv64.whl

pip install pycocotools-2.0.6-cp311-cp311-linux_riscv64.whl

pip3 install loguru-0.7.0-py3-none-any.whl

pip3 install torch-2.0.0a0+gitc263bd4-cp311-cp311-linux_riscv64.whl

pip3 install MarkupSafe-2.1.3-cp311-cp311-linux_riscv64.whl

pip3 install torchvision-0.15.1a0-cp311-cp311-linux_riscv64.whl

pip3 install psutil-5.9.5-cp311-abi3-linux_riscv64.whl

pip3 install tqdm-4.65.0-py3-none-any.whl

pip3 install tabulate-0.9.0-py3-none-any.whl
During the installation process, other pure Python dependency packages will be involved, which pip will automatically download from the official source.
Install HHB-onnxruntime
HHB-onnxruntime has ported the SHL backend (execution providers), allowing onnxruntime to reuse the high-performance optimization code for T-Head CPU in SHL.
wget https://github.com/zhangwm-pt/onnxruntime/releases/download/riscv_whl/onnxruntime-1.14.1-cp311-cp311-linux_riscv64.whl
pip install onnxruntime-1.14.1-cp311-cp311-linux_riscv64.whl
Execution
Execute the onnx_inference.py example in the example directory
export PYTHONPATH=$PYTHONPATH:/root/YOLOX

python3 onnx_inference.py -m yolox_s.onnx -i soccer.png -o outdir -s 0.3 --input_shape 640,640
Parameter description:
- -m: Specify the model
- -i: Specify the image
- -o: Specify the output directory
- -s: Specify the detection threshold
- --input_shape: Specify the image size used for detection
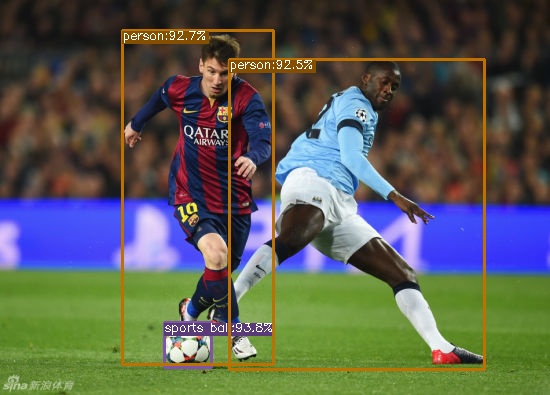
Reference Results
The input image in this tutorial, shown below, is a picture of players kicking a soccer ball. The expected detection result is two people and one soccer ball.
Image source: from the internet

After the example is executed normally, a result image soccer.png will be generated in the outdir directory. The image will draw a box around the detected targets and label them with probabilities, as shown in the following image:
Reference document:
https://wiki.sipeed.com/hardware/zh/lichee/th1520/lpi4a/8_application.html