RTMPose 实时演示
本教程将引导你如何通过 在 RevyOS 系统上实时获取并演示 RTMPose 模型。RTMPose 是一种基于 MMPose 框架的高性能人体姿态估计模型。
初始环境配置
在按照本教程操作前,请确保你已经完成了环境配置部分的内容。
实时获取图像
对于 LPi4A 上的 RevyOS 系统上,推荐使用 USB 的摄像头组件即插即用。通过摄像头的输入作为模型输入,对捕获到的图像帧做预处理及模型推理。在之前的教程中已经能够通过图片进行模型运行演示,接下来将通过使用 opencv 的接口获取摄像头的输入,对图像进行实时演示模型。
我们只需要将教程2中的 main_2.py 拷贝文件为 main_3.py ,并使用如下代码替换 main 函数中的内容:
def main():
    args = parse_args()
    logger.info('Start running model on RTMPose...')

    # build onnx model
    logger.info('1. Build onnx model ...')
    sess = build_session(args.onnx_file, args.device)
    sess1 = build_session("rtmpose1_fp16.onnx", args.device)
    hhb_sess = shl_wrapper.load_model("shl.hhb.bm")
    h, w = sess.get_inputs()[0].shape[2:]
    model_input_size = (w, h)

    cap = cv2.VideoCapture(0)

    while True:
        ret, frame = cap.read()

        if not ret:
            logger.info("cannt get frame")
            break

        # read image from camera
        logger.info('2. Read image from camera')
        cv2.imshow("USB Camera", frame)

        # preprocessing
        logger.info('3. Preprocess image...')
        resized_img, center, scale = preprocess(frame, model_input_size)

        # inference
        logger.info('4. Inference...')
        start_time = time.time()
        resized_img = resized_img.transpose(2, 0, 1)
        resized_img = resized_img.astype(np.float32)
        hhb_input = np.copy(resized_img, order="C")
        shl_wrapper.session_run(hhb_sess, [hhb_input])
        output0 = shl_wrapper.get_output_by_index(hhb_sess, 0)

        outputs = inference(sess1, output0.reshape(133,8,6))
        # outputs = inference(sess, resized_img)
        end_time = time.time()
        logger.info('4. Inference done, time cost: {:.4f}s'.format(end_time -
                                                                   start_time))
        # postprocessing
        logger.info('5. Postprocess...')
        keypoints, scores = postprocess(outputs, model_input_size, center, scale)

        # visualize inference result
        logger.info('6. Visualize inference result...')
        vframe = visualize(frame, keypoints, scores, args.save_path)

        cv2.imshow("USB Camera", vframe)

        cv2.waitKey(100)

        if cv2.waitKey(1) == 27:
            break

    logger.info('Done...')
    cap.release()
    cv2.destroyAllWindows()
并通过以下命令运行程序,模型正确执行后,将输出与本教程第一二部分类似的输出:
$ python3 camera.py rtmpose0.onnx
注意:
请在运行程序前确保摄像头已连接到开发板,并且摄像头驱动已正确安装。你可以通过 ls /dev/video* 命令检查摄像头设备是否存在。
$ ls /dev/video*
同时你也可以使用如下 opencv-python 的运行 damo 检测是否能捕获图像。
import cv2

# 打开摄像头
cap = cv2.VideoCapture(0)

# 检查是否成功打开摄像头
if not cap.isOpened():
    print("无法打开摄像头")
    exit()

# 循环读取摄像头的每一帧图像
while True:
    # 从摄像头中获取一帧图像
    ret, frame = cap.read()

    # 检查是否读取成功
    if not ret:
        print("无法获取图像")
        break

    # 显示图像
    cv2.imshow("USB Camera", frame)

    # 等待按下 ESC 键退出
    if cv2.waitKey(1) == 27:
        break

# 释放摄像头并关闭所有窗口
cap.release()
cv2.destroyAllWindows()
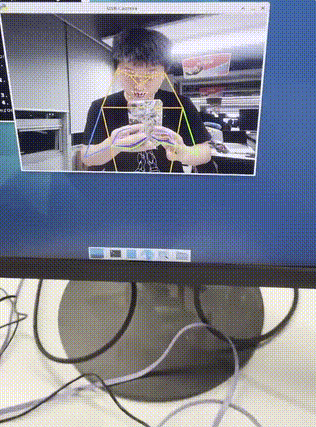
在运行 main_3.py 正常执行后,如果摄像头前有人时,会对捕获人像进行模型推理,对人的动态的肢体分析。
同时你也可以使用如下 opencv-python 的运行 damo 检测是否能捕获图像。
import cv2

# 打开摄像头
cap = cv2.VideoCapture(0)

# 检查是否成功打开摄像头
if not cap.isOpened():
    print("无法打开摄像头")
    exit()

# 循环读取摄像头的每一帧图像
while True:
    # 从摄像头中获取一帧图像
    ret, frame = cap.read()

    # 检查是否读取成功
    if not ret:
        print("无法获取图像")
        break

    # 显示图像
    cv2.imshow("USB Camera", frame)

    # 等待按下 ESC 键退出
    if cv2.waitKey(1) == 27:
        break

# 释放摄像头并关闭所有窗口
cap.release()
cv2.destroyAllWindows()
:::
在运行 main_3.py 正常执行后,如果摄像头前有人时,会对捕获人像进行模型推理,对人的动态的肢体分析。