RTMPose 性能优化
本教程将引导你如何通过 在 RevyOS 系统上对 RTMPose 模型进行优化模型的执行延迟的教程。
教程包括:
- 将单个模型切分成两个模型
- 量化第一部分模型到 int16 数据类型,并使用 NPU 执行
- 量化第二部分模型到 float16 数据类型,并使用 CPU 执行
环境准备
安装依赖包
在本教程中将会使用到一些额外的安装包,请在创建好虚拟环境的情况下进行依赖包的安装:
$ sudo apt update && sudo apt install cmake
$ pip install onnx onnxconverter_common
ONNX 模型切分
截取第一部分
使用如下代码文件 rtmpose0.py 截取原模型的第一部分,截取后的模型取名为 rtmpose0.onnx。
import onnx

input_path = "rtmpose.onnx"
output_path = "rtmpose0.onnx"
input_names = ["input"]
output_names = ["/final_layer/Conv_output_0"]

onnx.utils.extract_model(input_path, output_path, input_names, output_names)
并在本地正常执行生成 rtmpose0.onnx 模型。
截取第二部分
使用如下代码文件 rtmpose1.py 截取原模型的第二部分,截取后的模型取名为 rtmpose1.onnx。
import onnx

input_path = "rtmpose.onnx"
output_path = "rtmpose1.onnx"
input_names = ["/final_layer/Conv_output_0"]
output_names = ["simcc_x", "simcc_y"]

onnx.utils.extract_model(input_path, output_path, input_names, output_names)
并在本地正常执行生成 rtmpose1.onnx 模型。
NPU量化执行
NPU 的量化执行需要手机量化数据之后再进行量化,并将量化后的模型生成 LPi4A NPU 能执行的模型文件。
收集量化数据
HHB 量化时需要一些校准参数确定量化参数,通过拷贝一份 main.py 文件为 npz.py ,并将以下 main 函数中的内容进行替换执行获取:
def main():
    args = parse_args()
    logger.info('Start running model on RTMPose...')

    # read image from file
    logger.info('1. Read image from {}...'.format(args.image_file))
    img = cv2.imread(args.image_file)

    # build onnx model
    logger.info('2. Build onnx model from {}...'.format(args.onnx_file))
    sess = build_session(args.onnx_file, args.device)

    h, w = sess.get_inputs()[0].shape[2:]
    model_input_size = (w, h)

    # preprocessing
    logger.info('3. Preprocess image...')
    resized_img, center, scale = preprocess(img, model_input_size)

    # inference
    logger.info('4. Inference...')
    start_time = time.time()
    resized_img = resized_img.transpose(2, 0, 1)

    resized_img_npz = resized_img.reshape(1, 3, 256, 192).astype(np.float32)
    np.savez("test.npz", input=resized_img_npz)
在替换后运行 npz.py 文件获取到量化模型所需的校准数据,即可将输入图片的预处理结果保存在当前目录中,生成 test.npz 文件:
$ python3 npz.py rtmpose0.onnx human-pose.jpeg
模型量化
在 x86 终端上,使用上一步生成的 test.npz 作为校准数据,如下 HHB 命令将 ONNX 模型转换为 LPi4A 执行所需的模型文件:
$ hhb -f rtmpose0.onnx -cd test.npz -is "1 3 256 192" -in "input" \
    -on "/final_layer/Conv_output_0" --board th1520 -D --quantization-scheme int16_sym
生成模型文件
将 hhb_out 目录拷贝到开发板中,并执行 hhb_runtime ,正确执行后生成 NPU 执行所需的 shl.hhb.bm 模型权重文件:
$ ./hhb_runtime hhb.bm input.0.bin
CPU量化执行
模型量化
截取的第二部分模型使用 float16 数据类型进行量化,使用如下 rtmpose1_fp16.py 将其转换为 float16 的模型:
import onnx
from onnxconverter_common import float16

model = onnx.load("rtmpose1.onnx")
model_fp16 = float16.convert_float_to_float16(model)
onnx.save(model_fp16, "rtmpose1_fp16.onnx")
并在本地正常执行生成 rtmpose1_fp16.onnx 模型。
串接模型
在 NPU 和 CPU 分别量化执行后,对两部分模型进行串接执行。再次拷贝 main.py 文件为 main_2.py ,并将以下 main 函数中的内容进行替换:
def main():
    args = parse_args()
    logger.info('Start running model on RTMPose...')

    # read image from file
    logger.info('1. Read image from {}...'.format(args.image_file))
    img = cv2.imread(args.image_file)

    # build onnx model
    logger.info('2. Build onnx model from {}...'.format(args.onnx_file))
    sess = build_session(args.onnx_file, args.device)
    sess1 = build_session("rtmpose1_fp16.onnx", args.device)
    hhb_sess = shl_wrapper.load_model("shl.hhb.bm")
    h, w = sess.get_inputs()[0].shape[2:]
    model_input_size = (w, h)

    # preprocessing
    logger.info('3. Preprocess image...')
    resized_img, center, scale = preprocess(img, model_input_size)

    # inference
    logger.info('4. Inference...')
    start_time = time.time()
    resized_img = resized_img.transpose(2, 0, 1)

    # resized_img_npz = resized_img.reshape(1, 3, 256, 192).astype(np.float32)
    # np.savez("test.npz", input=resized_img_npz)

    resized_img = resized_img.astype(np.float32)
    hhb_input = np.copy(resized_img, order="C")

    shl_wrapper.session_run(hhb_sess, [hhb_input])
    output0 = shl_wrapper.get_output_by_index(hhb_sess, 0)

    outputs = inference(sess1, output0.reshape(133,8,6))

    end_time = time.time()
    logger.info('4. Inference done, time cost: {:.4f}s'.format(end_time -
                                                               start_time))

    # postprocessing
    logger.info('5. Postprocess...')
    keypoints, scores = postprocess(outputs, model_input_size, center, scale)

    # visualize inference result
    logger.info('6. Visualize inference result...')
    visualize(img, keypoints, scores, args.save_path)

    logger.info('Done...')
执行命令
python3 main_3.py rtmpose.onnx human-pose.jpeg
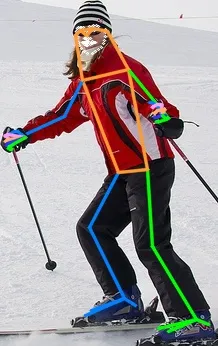
模型正确执行后,将输出与本教程第一部分类似的输出。
并在本地正常执行生成 output.jpg 的输出图像并如教程1相同效果,且经过上述的性能优化工作后,每帧的处理时间预期能降低到 100 ms 以内。
执行成功后,你将会看到生成的 output.jpg 的输出图像.